

Vibrating steering wheel is likely just wheel balancing.
Sent from my SM-G988B using Tapatalk
Wot, not another '79 Targa resto thread
Moderator: Bootsy
-
RobFrost
- DDK 1st, 2nd and 3rd for me!
- Posts: 2068
- Joined: Thu Jul 08, 2021 8:18 am
- Location: Lichfield
Re: Wot, not another '79 Targa resto thread
1970 911T, Signal orange (Restoration thread)
1988 3.2 Carrera backdate, Black
2001 996 Turbo, Lapis blue (am I allowed to put that here?)
I'm looking for a pre-impact bumper 911S or other high-revving 911 to restore - please let me know if you see one.
1988 3.2 Carrera backdate, Black
2001 996 Turbo, Lapis blue (am I allowed to put that here?)
I'm looking for a pre-impact bumper 911S or other high-revving 911 to restore - please let me know if you see one.
-
PeterK

- DDK rules my life!
- Posts: 1070
- Joined: Mon Sep 01, 2014 3:04 pm
- Location: GU51 - Fleet, Hampshire, UK
Re: Wot, not another '79 Targa resto thread
I thought that Rob, and will get them checked with my geo, but there was some (slight) radial movement on the wheel. As this is my first 911 I’ve no idea what ‘normal’ feels like, so I’ll tap in a new bush and see whether it makes a difference.
Sent from my iPad using Tapatalk
Sent from my iPad using Tapatalk
'79 Targa - restoration now mainly complete & being driven
viewtopic.php?f=28&t=59756
viewtopic.php?f=28&t=59756
-
Darren65

- Nurse, I think I need some assistance
- Posts: 7873
- Joined: Mon Dec 13, 2010 10:55 pm
- Location: North Wiltshire
- Contact:
Re: Wot, not another '79 Targa resto thread
I've enjoyed following this thread and it was great to get a ride in the car at Le Mans. A top guy and an excellent achievement.
Credit to you Peter, you've done well
Credit to you Peter, you've done well
Darren
72T 2.5... http://ddk-online.com/phpBB2/viewtopic.php?f=10&t=56183
73 2.4E ... http://ddk-online.com/phpBB2/viewtopic.php?f=10&t=44242
77 Carrera 3.0...to 74 3.0RS ... http://ddk-online.com/phpBB2/viewtopic.php?f=28&t=63389
72T 2.5... http://ddk-online.com/phpBB2/viewtopic.php?f=10&t=56183
73 2.4E ... http://ddk-online.com/phpBB2/viewtopic.php?f=10&t=44242
77 Carrera 3.0...to 74 3.0RS ... http://ddk-online.com/phpBB2/viewtopic.php?f=28&t=63389
-
PeterK
- DDK rules my life!
- Posts: 1070
- Joined: Mon Sep 01, 2014 3:04 pm
- Location: GU51 - Fleet, Hampshire, UK
Re: Wot, not another '79 Targa resto thread
Let’s start with the photos I forgot to include yesterday.
Firstly, this is the pile of tools and spares that I took to CLM
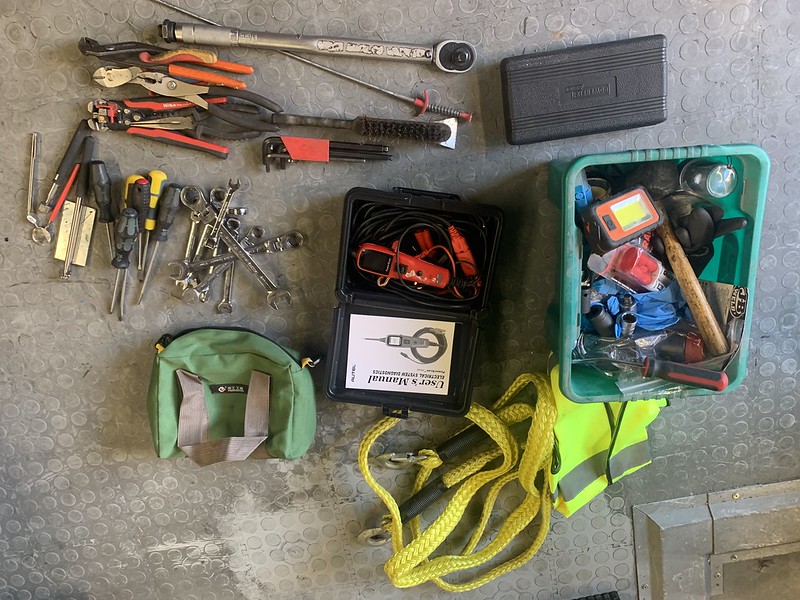
…. and this is the pile of the items that I actually needed (but better to have and not need, than need and not have).
Today, Alex the Garage Bitch arrived, and we managed to reset the rear ride height to 620. We only needed to play with the eccentric adjuster, although by the time I realised, we had the swing arms apart anyway. Never mind, laser alignment booked for the morning. We did set the rear camber (but not the tracking) and reset the front ride height back to 625 (adjusting the rear upwards had also raised the front) and checked camber (which was fine). It will be interesting to see what the laser tool reads against my simple (and cheap) camber gauge). We also set the wiper blades one spline further around. When the screen is really wet with glass cleaner, the driver’s side blade is just starting to slip onto the screen rubber, but the majority of it remains on the screen. When the screen is dry, the wipers now park at a more reasonable angle.
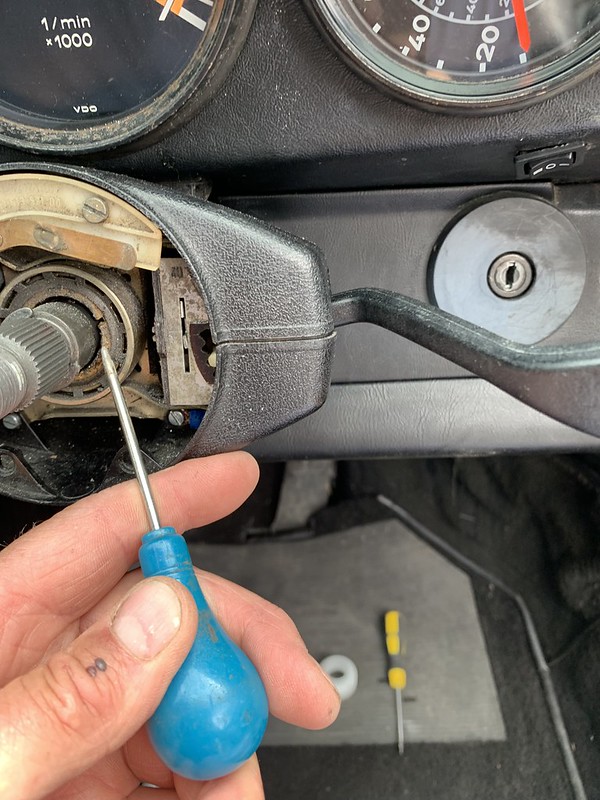
After the GB left, I stripped the dip/main switch.
Off with the steering wheel, then the cowling, which has a machine screw each side

And 2 more for both the top and bottom cowlings, just indie. I did need to remove this horn connector ring to access the 2 on the top cowling.


I pulled the switch out (without disconnecting the looms) and liberally sprayed with contact cleaner, and also slightly bent the main beam finger (the one sitting towards the front of the car in this almost re-assembled picture). After refitting everything, it is all now working as it should.

The steering column top bush is perhaps past its prime, so a good job the replacement should arrive tomorrow or the day after.

I looked for the HRW switch in the froot, but it is so hidden behind the HVAC system (especially as I have air con with a few extra parts compared to standard), I decided that if I need the heated screens in the dark, I can see the fog switch and the HRW will be somewhere to the right of that.
I also pulled out the gauges and check ed the earth connections. Can’t tell if that made any difference, so will need a dark night. Maybe coming back from the Fairmile on the 20th of this month (July).
While the gauges were out, I found a set of imperial allen keys and tightened my phone holder that fits around the clock – it had been drunkenly slipping around on the motorways of France.
STOP PRESS – laser alignment booked for the morning
Firstly, this is the pile of tools and spares that I took to CLM
…. and this is the pile of the items that I actually needed (but better to have and not need, than need and not have).
Today, Alex the Garage Bitch arrived, and we managed to reset the rear ride height to 620. We only needed to play with the eccentric adjuster, although by the time I realised, we had the swing arms apart anyway. Never mind, laser alignment booked for the morning. We did set the rear camber (but not the tracking) and reset the front ride height back to 625 (adjusting the rear upwards had also raised the front) and checked camber (which was fine). It will be interesting to see what the laser tool reads against my simple (and cheap) camber gauge). We also set the wiper blades one spline further around. When the screen is really wet with glass cleaner, the driver’s side blade is just starting to slip onto the screen rubber, but the majority of it remains on the screen. When the screen is dry, the wipers now park at a more reasonable angle.
After the GB left, I stripped the dip/main switch.
Off with the steering wheel, then the cowling, which has a machine screw each side
And 2 more for both the top and bottom cowlings, just indie. I did need to remove this horn connector ring to access the 2 on the top cowling.
I pulled the switch out (without disconnecting the looms) and liberally sprayed with contact cleaner, and also slightly bent the main beam finger (the one sitting towards the front of the car in this almost re-assembled picture). After refitting everything, it is all now working as it should.
The steering column top bush is perhaps past its prime, so a good job the replacement should arrive tomorrow or the day after.
I looked for the HRW switch in the froot, but it is so hidden behind the HVAC system (especially as I have air con with a few extra parts compared to standard), I decided that if I need the heated screens in the dark, I can see the fog switch and the HRW will be somewhere to the right of that.
I also pulled out the gauges and check ed the earth connections. Can’t tell if that made any difference, so will need a dark night. Maybe coming back from the Fairmile on the 20th of this month (July).
While the gauges were out, I found a set of imperial allen keys and tightened my phone holder that fits around the clock – it had been drunkenly slipping around on the motorways of France.
STOP PRESS – laser alignment booked for the morning
'79 Targa - restoration now mainly complete & being driven
viewtopic.php?f=28&t=59756
viewtopic.php?f=28&t=59756
-
PeterK
- DDK rules my life!
- Posts: 1070
- Joined: Mon Sep 01, 2014 3:04 pm
- Location: GU51 - Fleet, Hampshire, UK
Re: Wot, not another '79 Targa resto thread
Laser alignment done – it’s amazing how close you can get rear camber using a bubble gauge !.
Back home & the steering bush had arrived. Remove steering wheel using 27mm socket and then remove and discard the star washer

Clean out failed bush
Remove circlip

Clean out any loose bits of the failed bush and drift in new bush using a long socket – I used a 30mm as that was to hand.
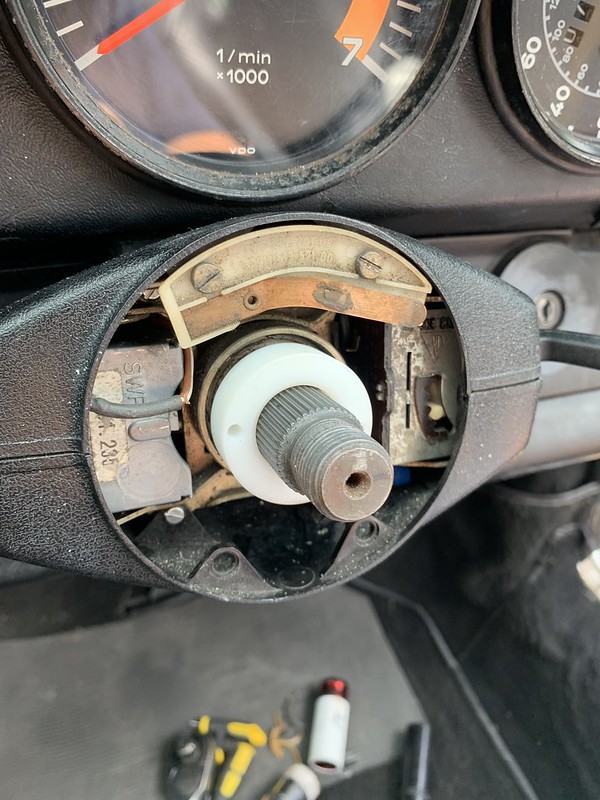

My bush came with 2 grub screws, one of which was damaged, but I screwed the other one in. No idea what it’s for but assume that it swells the bush. Refit circlip.

Then refit the steering wheel and sit back and enjoy a steering wheel with less wobble.
Back home & the steering bush had arrived. Remove steering wheel using 27mm socket and then remove and discard the star washer
Clean out failed bush
Remove circlip
Clean out any loose bits of the failed bush and drift in new bush using a long socket – I used a 30mm as that was to hand.
My bush came with 2 grub screws, one of which was damaged, but I screwed the other one in. No idea what it’s for but assume that it swells the bush. Refit circlip.
Then refit the steering wheel and sit back and enjoy a steering wheel with less wobble.
'79 Targa - restoration now mainly complete & being driven
viewtopic.php?f=28&t=59756
viewtopic.php?f=28&t=59756
-
PeterK
- DDK rules my life!
- Posts: 1070
- Joined: Mon Sep 01, 2014 3:04 pm
- Location: GU51 - Fleet, Hampshire, UK
Re: Wot, not another '79 Targa resto thread
I decided to clean the French flies off the car, so a quick wash and out to our village fete. Back home and it rained that ‘ploppy’ rain, so it’s all dirty again. Don’t think I’ll bother washing it anymore if it’s just going to get dirty again.
Had another go at tidying the rear edge of the targa outer cover, then added the headliner.
First tape up the raised sections of the re-enforcing plates

Apply spray glue

Remove tape

Mark centres of the sides of the headliner

Align & affix the middle of headliner

Stick down rest of headliner, remember that you forgot to take of the tape from the second side, feret about and remove tape, then glue and affix the sides.

Tidy up and refit targa roof to car. Drive and fill up fuel tank – ouch !
I’ve got new (to me) outer door handles to fit, but it’s been too hot, so maybe soon …..
Had another go at tidying the rear edge of the targa outer cover, then added the headliner.
First tape up the raised sections of the re-enforcing plates
Apply spray glue
Remove tape
Mark centres of the sides of the headliner
Align & affix the middle of headliner
Stick down rest of headliner, remember that you forgot to take of the tape from the second side, feret about and remove tape, then glue and affix the sides.
Tidy up and refit targa roof to car. Drive and fill up fuel tank – ouch !
I’ve got new (to me) outer door handles to fit, but it’s been too hot, so maybe soon …..
'79 Targa - restoration now mainly complete & being driven
viewtopic.php?f=28&t=59756
viewtopic.php?f=28&t=59756
-
PeterK
- DDK rules my life!
- Posts: 1070
- Joined: Mon Sep 01, 2014 3:04 pm
- Location: GU51 - Fleet, Hampshire, UK
Re: Wot, not another '79 Targa resto thread
Door handles. The trigger of the near-side (passenger) door handle was not healthy, plus sometimes I couldn’t open the door if I unlocked it from the outside or using the remote, although it was fine if I unlocked it manually from the inside.
First, of course, all of the door internal paraphernalia had to come off – pockets, armrests, door pull, door card, etc. Then the door handle can be removed by undoing the two 8mm nuts.
Quick tip – before proceeding with dismantling the door lever, insert your key. This stops the fiddly little fingers from falling out. No, this tip was not borne of mishap, but thankfully Andrew (Fat Fuchs on IB) mentioned it recently.
The only difference that I could see / find in the door handles was the lock actuating end pieces, that are labelled L & R.

Undo the screw and remove the lock actuator piece, ensuring that the little spring doesn’t go walk-about and remove the lock actuator

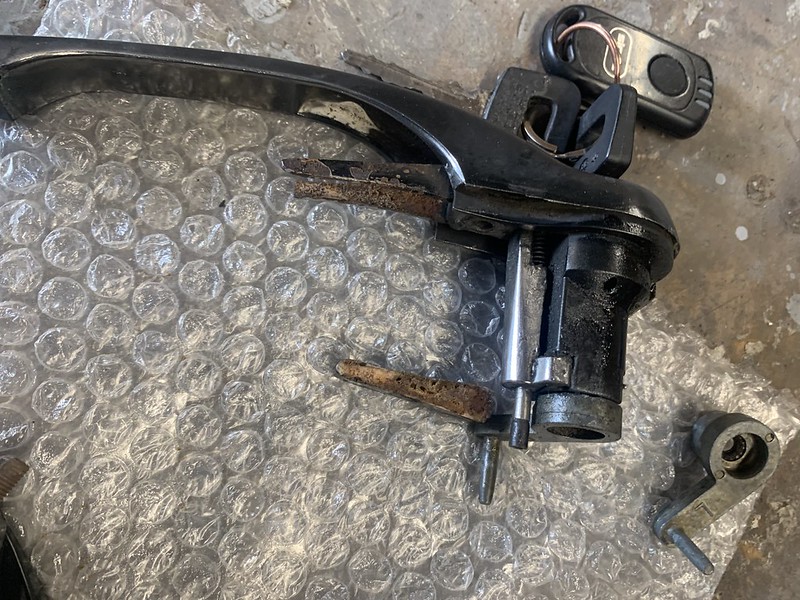
The barrel (don’t forget to use the key) simply pulls out

Then slide off the tower bit retaining the spring (the long shiny bit in this picture). I used a flat-bladed screwdriver to assist. There was a slight gap between the shiny bit and the main body.

The trigger just sits under the tower/shiny bit

I replaced the trigger, and as there are two slightly different versions, each with its own type of poking stick (the shaft poking out of the bottom of the shiny / tower part – this actuates the door release part of the lock mechanism in the door), I also replaced the tower, then assembly is simply the reverse of stripping.
Some ‘poking sticks’ are adjustable, and my replacement was, so I wound it out to give the maximum chance of opening the door. Mistake . Having completely rebuilt the door and having the ill-found confidence of the ill-informed, I fully reassembled the door trim and then found that the door wouldn’t latch. If the ‘poking stick’ is too long, it always presses on the door release mechanism in the lock, and the door won’t latch.
So, strip the door again, adjust the ‘poking stick’ until the door release mechanism is at rest, test before rebuilding the door, smile and finish rebuilding the door.
First, of course, all of the door internal paraphernalia had to come off – pockets, armrests, door pull, door card, etc. Then the door handle can be removed by undoing the two 8mm nuts.
Quick tip – before proceeding with dismantling the door lever, insert your key. This stops the fiddly little fingers from falling out. No, this tip was not borne of mishap, but thankfully Andrew (Fat Fuchs on IB) mentioned it recently.
The only difference that I could see / find in the door handles was the lock actuating end pieces, that are labelled L & R.
Undo the screw and remove the lock actuator piece, ensuring that the little spring doesn’t go walk-about and remove the lock actuator
The barrel (don’t forget to use the key) simply pulls out
Then slide off the tower bit retaining the spring (the long shiny bit in this picture). I used a flat-bladed screwdriver to assist. There was a slight gap between the shiny bit and the main body.
The trigger just sits under the tower/shiny bit
I replaced the trigger, and as there are two slightly different versions, each with its own type of poking stick (the shaft poking out of the bottom of the shiny / tower part – this actuates the door release part of the lock mechanism in the door), I also replaced the tower, then assembly is simply the reverse of stripping.
Some ‘poking sticks’ are adjustable, and my replacement was, so I wound it out to give the maximum chance of opening the door. Mistake
So, strip the door again, adjust the ‘poking stick’ until the door release mechanism is at rest, test before rebuilding the door, smile and finish rebuilding the door.
'79 Targa - restoration now mainly complete & being driven
viewtopic.php?f=28&t=59756
viewtopic.php?f=28&t=59756
-
911hillclimber
- Nurse, I think I need some assistance
- Posts: 18970
- Joined: Mon Mar 10, 2008 6:26 pm
- Location: West Midlands
Re: Wot, not another '79 Targa resto thread
You need to write tutorial manual for 911's!
73T 911 Coupe, road/hillclimber 3.2L
Lola t 492 / 3.2 hillclimb racer
Boxster 987 Gen II 2.9
Lola t 492 / 3.2 hillclimb racer
Boxster 987 Gen II 2.9
-
PeterK
- DDK rules my life!
- Posts: 1070
- Joined: Mon Sep 01, 2014 3:04 pm
- Location: GU51 - Fleet, Hampshire, UK
Re: Wot, not another '79 Targa resto thread
I probably need to read one 
'79 Targa - restoration now mainly complete & being driven
viewtopic.php?f=28&t=59756
viewtopic.php?f=28&t=59756
Re: Wot, not another '79 Targa resto thread
Hi Peter. What size Rivnuts did you use for the armrests, I am building my doors and need to do same thing. Thanks Mike
-
PeterK
- DDK rules my life!
- Posts: 1070
- Joined: Mon Sep 01, 2014 3:04 pm
- Location: GU51 - Fleet, Hampshire, UK
Re: Wot, not another '79 Targa resto thread
I’m used M5 rivnuts for the blocks that secure the door pockets, not the armrests
'79 Targa - restoration now mainly complete & being driven
viewtopic.php?f=28&t=59756
viewtopic.php?f=28&t=59756
Re: Wot, not another '79 Targa resto thread
Hi Peter OK Thanks Mike
-
neilbardsley
- Nurse, I think I need some assistance
- Posts: 7777
- Joined: Mon Apr 16, 2012 4:31 pm
Re: Wot, not another '79 Targa resto thread
What are rivnuts? I need to secure the armrest/pocket to my 914 doorcard. The 3 screws aren't working. Things keep dropping out of the bottom
Sent from my M2004J19C using Tapatalk
Sent from my M2004J19C using Tapatalk
“A REMINDER. I would be grateful if those members who have borrowed bits from me in emergencies (e.g starter motor, oil cooler, etc) would return them and/or contact me”. – Chris Turner RIP
-
Jonny Hart

- Put a fork in me, I'm done!
- Posts: 1548
- Joined: Mon Feb 01, 2010 2:28 pm
Re: Wot, not another '79 Targa resto thread
^ There's this great thing called Google....
-
PeterK
- DDK rules my life!
- Posts: 1070
- Joined: Mon Sep 01, 2014 3:04 pm
- Location: GU51 - Fleet, Hampshire, UK
Re: Wot, not another '79 Targa resto thread
Good news & less good news day for my SC. It passed its MOT without issue (yes, I know that it doesn't need one, but always useful to get a second opinion annually).
However, I discovered a small issuette with the gearstick on the way to the test station. The gearstick rotates. It did this when I bought it (5th gear was unobtainable as the rotation caused the reverse lock out to block access to 5th), but during my resto I added a splurge of weld to the gearstick shaft and that stuck it in position. The weld didn't want to take to the casting that the steel gear stick shaft fits into, but it was enough to stop any rogue rotation. That has clearly now failed, so is there a more robust fix ? Don’t want to have to spend almost £200 on a new gearstick
However, I discovered a small issuette with the gearstick on the way to the test station. The gearstick rotates. It did this when I bought it (5th gear was unobtainable as the rotation caused the reverse lock out to block access to 5th), but during my resto I added a splurge of weld to the gearstick shaft and that stuck it in position. The weld didn't want to take to the casting that the steel gear stick shaft fits into, but it was enough to stop any rogue rotation. That has clearly now failed, so is there a more robust fix ? Don’t want to have to spend almost £200 on a new gearstick
'79 Targa - restoration now mainly complete & being driven
viewtopic.php?f=28&t=59756
viewtopic.php?f=28&t=59756