

Rob I would check out the Vintage Speed UK shifters. I put one in my speedster and it totally transformed the feel and gear selection.
Well worth a try as I have used both the Flat 4 and Empi and was not impressed.
Burnt Pig - 356 Pre a Build Thread
Moderator: Bootsy
-
Spyder-finder

- DDK Fanatic
- Posts: 90
- Joined: Wed Feb 01, 2006 10:40 am
- Location: Rochester, England
Re: Burnt Pig - 356 Pre a Build Thread
RS60, 550, 356 Speedster, 356 outlaw coupe, KTM RC8 and 1955 Norton Dominator 88
Why tip toe through life only to arrive safely at death!
Why tip toe through life only to arrive safely at death!
Re: Burnt Pig - 356 Pre a Build Thread
What's upside down???Bruce M wrote:That might work just fine.
But the assembly is upside down compared to stock use.
Sent from my SM-G930F using Tapatalk
Re: Burnt Pig - 356 Pre a Build Thread
On a 944, the handbrake cable enters the brake assembly from the front, below the CV joint. So compared to stock, you have the back plate calliper mounts on the opposite side and upside down.
There are a couple of photos, about 60 posts back that show the stock configuration of the assembly.
But as I say, it might work just fine how it is.
There are a couple of photos, about 60 posts back that show the stock configuration of the assembly.
But as I say, it might work just fine how it is.
Re: Burnt Pig - 356 Pre a Build Thread
The biggest issue I found was getting the 944 handbrake cable to work with the Beetle handbrake. So the choice of 944 cables is either too long or short and no adjustment at the handbrake end. I used the longer version which I cut down and then best to get an adjustable screw/ thread clamped to the cable by a cable manufacturer. I tried to find some pictures, of the hundreds I have none show this detail.
1963 Karmann Ghia
1959 356A Coupe Outlaw
1957 3.2 Speedster replica
1959 356A Coupe Outlaw
1957 3.2 Speedster replica
Re: Burnt Pig - 356 Pre a Build Thread
In the example I posted earlier, it uses unmodified stock beetle handbrake cables. However that is with a full size pan so not directly comparable.
Re: Burnt Pig - 356 Pre a Build Thread
Right had another look at the photo and see what you mean. I will swap them over next time I'm out in the garage - best to put them as Ferdinand intended. Thanks for taking the time to look at the photos as I really appreciate the advice from those that have already trodden the path....Bruce M wrote:On a 944, the handbrake cable enters the brake assembly from the front, below the CV joint. So compared to stock, you have the back plate calliper mounts on the opposite side and upside down.
There are a couple of photos, about 60 posts back that show the stock configuration of the assembly.
But as I say, it might work just fine how it is.
Re: Burnt Pig - 356 Pre a Build Thread
I have Gary's shortened Beetle Handbrake cables from Speedster Clinic and they are mated to the 944 brakes by some swan adaptors that seem to mount up ok to the beetle cable.Bruce M wrote:In the example I posted earlier, it uses unmodified stock beetle handbrake cables. However that is with a full size pan so not directly comparable.

The problem I am foreseeing is how to get the 944 handbrake tubes to mate to the beetle cable - the 944 tubes are stepped and if i cut the top section of then I think the beetle outer cable will slot into the end of the tube but its a question of how do i stop the outer cable going to far in to the handbrake tube....i could just weld some washers at the right point.....
Re: Burnt Pig - 356 Pre a Build Thread
I tried lots of different VW cable combinations, none had the correct fixing at the 944 brake end or the right length. I eventually used a combination of a shortened 944 cable and new cable tubes. I plan at some stage to get some new cables custom made. At the moment I am just trying to focus on the IVA test. 
1963 Karmann Ghia
1959 356A Coupe Outlaw
1957 3.2 Speedster replica
1959 356A Coupe Outlaw
1957 3.2 Speedster replica
Re: Burnt Pig - 356 Pre a Build Thread
I like my service parts to be "off the shelf". 
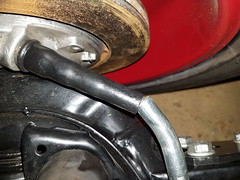
I found the stock handbrake conduits to be roughly the right length. Maybe an inch long but they do work. I had a fat cable tie, slack, supporting the conduits using the drilled hole in the lower shock mount on the a-arm to reduce the waggling around
To have a better fit at the hub end, I had some thick wall aluminium tube which I drilled out to the size of the steel tube (slightly undersized). After both parts were painted, I warmed the alloy tube and tapped over the steel tube to the first step. Once cooled it shrank to a tight fit. The extension supports the conduit and keeps it aligned with the steel tube.
You can see the modification in the posted photos but if you want a close up or more info, let me know.
Re: Burnt Pig - 356 Pre a Build Thread
Ah, found an old photo. This was a test fit. I knocked it off afterwards to finish & paint (to reduce galvanic corrosion).


Re: Burnt Pig - 356 Pre a Build Thread
Hi Paul,Spyder-finder wrote:Rob I would check out the Vintage Speed UK shifters. I put one in my speedster and it totally transformed the feel and gear selection.
Well worth a try as I have used both the Flat 4 and Empi and was not impressed.
I do like the Vintage Speed Stuff as the Throttle linkage and Exhaust I have are superb quality, but I will stick with the 2 I have at the moment and see how I get on with them before I move to another one. I would be interested to hear if anyone has got experience of the mamba mk2 ones as this is the one i would go for if I were to switch.
Re: Burnt Pig - 356 Pre a Build Thread
Bruce M wrote:Ah, found an old photo. This was a test fit. I knocked it off afterwards to finish & paint (to reduce galvanic corrosion).
Yep get it... this is the way I'll go... I'll order some thick wall tube and then drill it out to make both beetle cable end and 944 tubes line up. I will then shorten tubes if necessary to get the right amount of adjustment.
Re: Burnt Pig - 356 Pre a Build Thread
You could use thinner wall steel tube and weld it on... I had the ali tube to hand so just used that.
Re: Burnt Pig - 356 Pre a Build Thread
OK So I have now committed to getting the Body as Gary at Speedster Clinic made me an offer I couldn't refuse. Gary is collecting the body tomorrow from his fibreglass works and I am going up to see it in the flesh on Thursday to discuss when he will bond it on to the chassis hopefully some time in September.
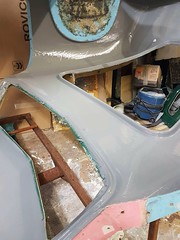
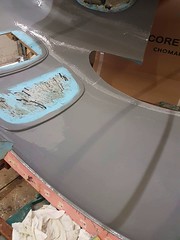
Here are a few pictures of the body under construction that shows how the body components are all made individually then bonded together....
Front screen and front Hood
Roof Rear screen and engine lid appature
Another picture of the rear screen, and engine lid, also showing the rear wheel arch

Inner Mouldings being fitted to the shell...
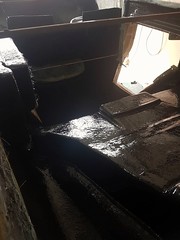
Rear Seat and Bulkhead
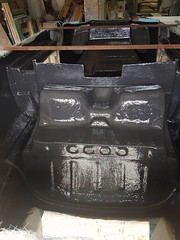
Front under bonnet area
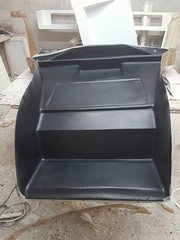
Rear Seat area before bonding to shell

Here are a few pictures of the body under construction that shows how the body components are all made individually then bonded together....
Front screen and front Hood
Roof Rear screen and engine lid appature
Another picture of the rear screen, and engine lid, also showing the rear wheel arch
Inner Mouldings being fitted to the shell...
Rear Seat and Bulkhead
Front under bonnet area
Rear Seat area before bonding to shell
Re: Burnt Pig - 356 Pre a Build Thread
SO went up to see Gary at Speedster Clinic a couple of weeks ago and saw my body for the first time and it really is a thing of beauty even in its raw state. I will save publishing any pictures of it for the moment as next month it should be mated to teh body and then it will start to look like a proper car. Gary did send me away with the Pre A dash and once I have finished the rolling chassis then this will get my attention whilst the chassis is away being bonded to the body.
Some small progress on the rolling chassis but it has been death by lots of small parts over the last month or so heres my recent progress:
Gear Rod Linkage
When I was at Speedster Clinic the other week Gary made me my specially shortened gear rod linkage and I came home and went to install it and there was no gear linkage bush so had to order one before I could install it. This duly arrived, and was easy enough to install from the front of the car without taking the gearbox out again. This is all now hooked up to the Flat 4 gear lever and gearbox using a new gear linkage connector. There is still some work to do to get the FLat 4 gear lever to work as I cant select reverse at the moment and overall the linkage seems quite stiff / notchy even though I covered everything with a liberal coating of grease. I do have another lever (Empi) that I might try to see if this is any better.
Pedal Installation
Next I installed the pedal assembly, again I needed a load of small parts (tunnel bushing, pedal stop, throttle pan hinge mount and some circlips) which all had to be ordered and then wait for delivery.
First I needed to install the Porsche 944 master cylinder to make sure it all lined up with the pedals and to do this on Gary's Speedster Clinic chassis which has a double firewall with 30mm between the 2 x steel sheets I added some Stainless steel tube strengtheners so that when the nut & bolts to secure the master cylinder were done up they would not distort the sheet steel of the firewall. I also found out that I can use standard dual master cylinder Beetle Remote pipe fittings to allow the remote mounting of the master cylinder fluid reservoirs.
Next I rough bolted the pedal box in place then using the diagram I found on the Internet I measured out where the 3 bolts needed to go in the floor pan to hold the pedal securing components. They were exactly as per the diagram but as the floor is a little higher than Std. beetle I had to cut down the bit that sticks up on the pedal stop to allow it to fit under the tube. I used RIVNUTS to secure the items to the floorpan. I then added the clutch cable and fitted the standard Beetle brake push rod which I cut down by XXmm and the pedal stop which is adjustable and can be set once I have the seats and accelerator pedal installed.

Gary suggested I wait to fit the hinge mount to the floorpan until after I install the foot rest plates (New item from Speedster Clinic) to ensure it all lines up properly.
Gearbox
Finally bolted in after I had filed out mounting holes in the cross member to be 5mm longer to cater for the Mendola mounting plates on the end of the gearbox horns.
Still got to flip the rear brakes over to mount them the right way up....
Some small progress on the rolling chassis but it has been death by lots of small parts over the last month or so heres my recent progress:
Gear Rod Linkage
When I was at Speedster Clinic the other week Gary made me my specially shortened gear rod linkage and I came home and went to install it and there was no gear linkage bush so had to order one before I could install it. This duly arrived, and was easy enough to install from the front of the car without taking the gearbox out again. This is all now hooked up to the Flat 4 gear lever and gearbox using a new gear linkage connector. There is still some work to do to get the FLat 4 gear lever to work as I cant select reverse at the moment and overall the linkage seems quite stiff / notchy even though I covered everything with a liberal coating of grease. I do have another lever (Empi) that I might try to see if this is any better.
Pedal Installation
Next I installed the pedal assembly, again I needed a load of small parts (tunnel bushing, pedal stop, throttle pan hinge mount and some circlips) which all had to be ordered and then wait for delivery.
First I needed to install the Porsche 944 master cylinder to make sure it all lined up with the pedals and to do this on Gary's Speedster Clinic chassis which has a double firewall with 30mm between the 2 x steel sheets I added some Stainless steel tube strengtheners so that when the nut & bolts to secure the master cylinder were done up they would not distort the sheet steel of the firewall. I also found out that I can use standard dual master cylinder Beetle Remote pipe fittings to allow the remote mounting of the master cylinder fluid reservoirs.
Next I rough bolted the pedal box in place then using the diagram I found on the Internet I measured out where the 3 bolts needed to go in the floor pan to hold the pedal securing components. They were exactly as per the diagram but as the floor is a little higher than Std. beetle I had to cut down the bit that sticks up on the pedal stop to allow it to fit under the tube. I used RIVNUTS to secure the items to the floorpan. I then added the clutch cable and fitted the standard Beetle brake push rod which I cut down by XXmm and the pedal stop which is adjustable and can be set once I have the seats and accelerator pedal installed.
Gary suggested I wait to fit the hinge mount to the floorpan until after I install the foot rest plates (New item from Speedster Clinic) to ensure it all lines up properly.
Gearbox
Finally bolted in after I had filed out mounting holes in the cross member to be 5mm longer to cater for the Mendola mounting plates on the end of the gearbox horns.
Still got to flip the rear brakes over to mount them the right way up....