Burnt Pig - 356 Pre a Build Thread

Replica owners or enthusiasts are very welcome

Moderator: Bootsy

Robneal
DDK above all
Posts: 197
Joined: Tue Jul 26, 2016 10:26 pm

Re: Burnt Pig - 356 Pre a Build Thread

Post by Robneal »

mdmax72 wrote:If you got Mr Paul F putting your engine together you'll be in safe hands. ;-) he put mine together towards last year.

If your using the Red 9 rear suspension, you may end up having to change the springs if you've got a type 4 lump (being heavier) and depending on how low you want to run it. Can't remember if l need longer or shorter springs. The guys at Red 9 will happily change them if they are not scratched up etc for free. Theres a thread on here (suspension upgrade) if you go back through the pages. The front will be fine. Recommend a full suspension setup to get the most out of the suspension also. Centre Gravity are familiar with setting the Red 9 up.

Keep us all updated. Enjoy
Hi Max, I have my chassis booked in at Red9 for early March and they are doing the modifications to the front to allow their double wishbone set up to be bolted up. Simon also said he will look at the rear as well and get the spring rates correct. I will.make sure I publish the spring rates and lengths I end up with so others following a similar route can benefit.


Sent from my SM-G930F using Tapatalk
greg356a
I luv DDK!
Posts: 861
Joined: Sun Mar 25, 2012 9:16 am
Location: Norwich area
Contact:

Re: Burnt Pig - 356 Pre a Build Thread

Post by greg356a »

Morning, I was trying to advocate getting the body early to help with the placement of all the major components. Small detailed changes in position can have a larger effect with maintenance after the build is finished. Biggest problem is having somewhere to store the body whilst working on the chsssis. I started in a single garage so had to keep it outside.
If nothing else getting the body early is a great motivation.
1963 Karmann Ghia
1959 356A Coupe Outlaw
1957 3.2 Speedster replica
Robneal
DDK above all
Posts: 197
Joined: Tue Jul 26, 2016 10:26 pm

Re: Burnt Pig - 356 Pre a Build Thread

Post by Robneal »

I would love to get the body now, but its not really an option at the moment, single garage, not enough funds etc.etc. Going the Speedster Clinic route should mean it's going to be more of an Airfix kit approach rather than a complete bespoke build, but no doubt when I come to installing Steering column, Eberspacher Heater, brake servo etc without the body then I am going to have to rely on those that are ahead of me in their builds to take measurements for me.
greg356a
I luv DDK!
Posts: 861
Joined: Sun Mar 25, 2012 9:16 am
Location: Norwich area
Contact:

Re: Burnt Pig - 356 Pre a Build Thread

Post by greg356a »

Happy to help if I can
1963 Karmann Ghia
1959 356A Coupe Outlaw
1957 3.2 Speedster replica
Robneal
DDK above all
Posts: 197
Joined: Tue Jul 26, 2016 10:26 pm

Re: Burnt Pig - 356 Pre a Build Thread

Post by Robneal »

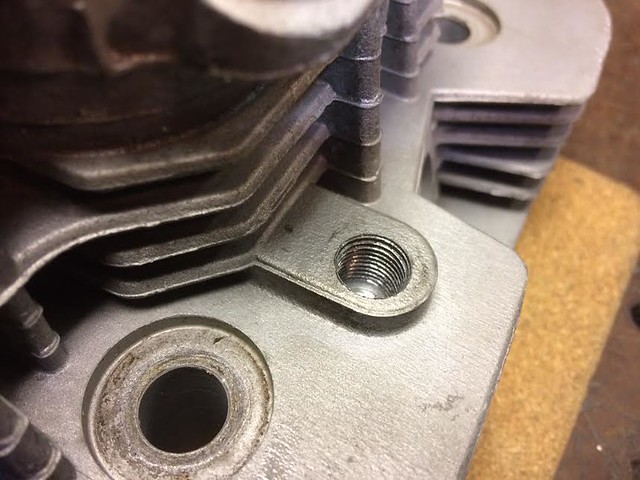
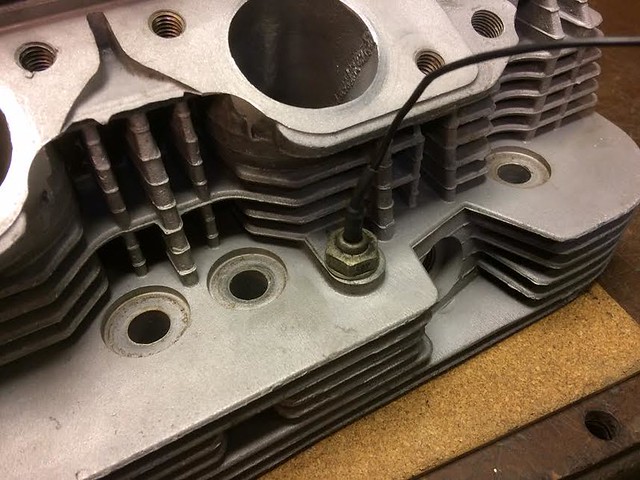
Small Update on the engine - Whilst Paul is waiting for the cases to be align bored he has drilled and tapped the head for the Type 4 Fuel injection Cylinder Head Temperature Sensor that will provide a vital feed to the Emerald ECU. According to Emerald this is the best way to get their ECU working on an air cooled engine.

First picture of the Tapped Hole

Image

With Cylinder Head Temperature Sensor installed

Image
Last edited by Robneal on Mon Jul 03, 2017 4:35 pm, edited 1 time in total.
Robneal
DDK above all
Posts: 197
Joined: Tue Jul 26, 2016 10:26 pm

Re: Burnt Pig - 356 Pre a Build Thread

Post by Robneal »

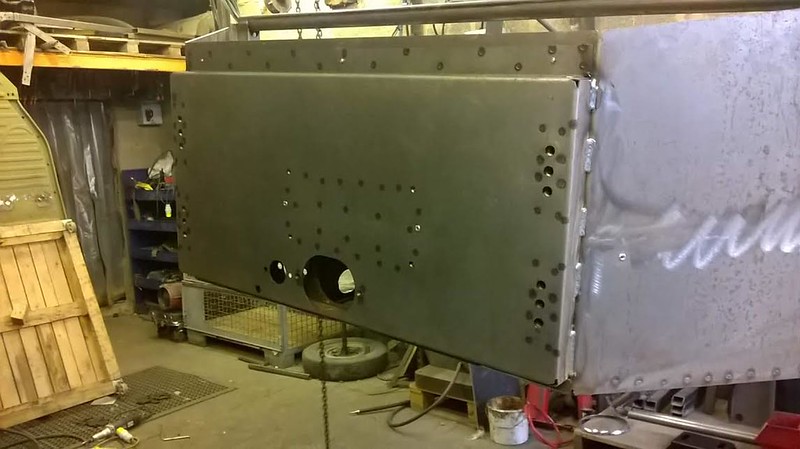
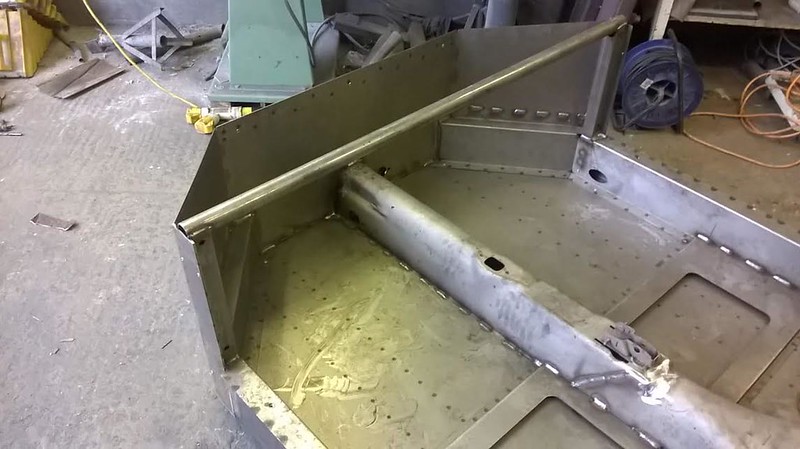
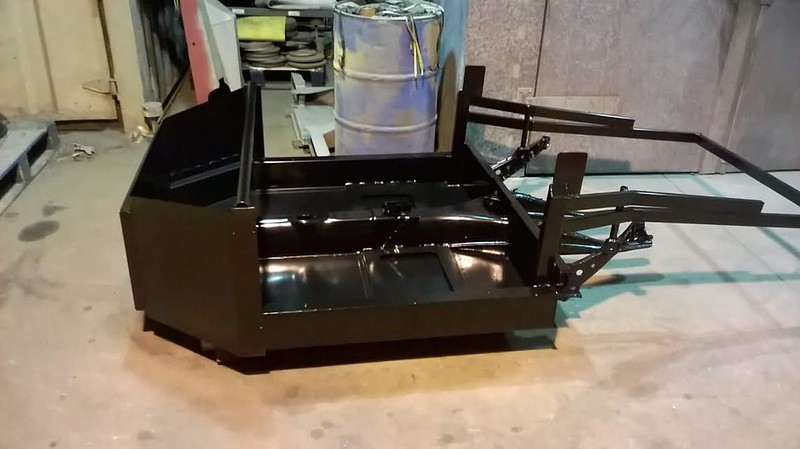
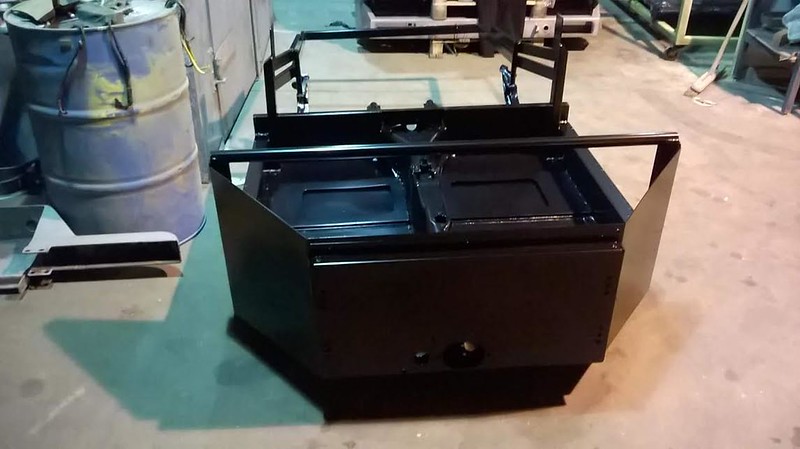
Thanks to Gary at Speedster Clinic, here is the first photo's of the Chassis....

Image

Image
Last edited by Robneal on Mon Jul 03, 2017 4:39 pm, edited 1 time in total.
Robneal
DDK above all
Posts: 197
Joined: Tue Jul 26, 2016 10:26 pm

Re: Burnt Pig - 356 Pre a Build Thread

Post by Robneal »

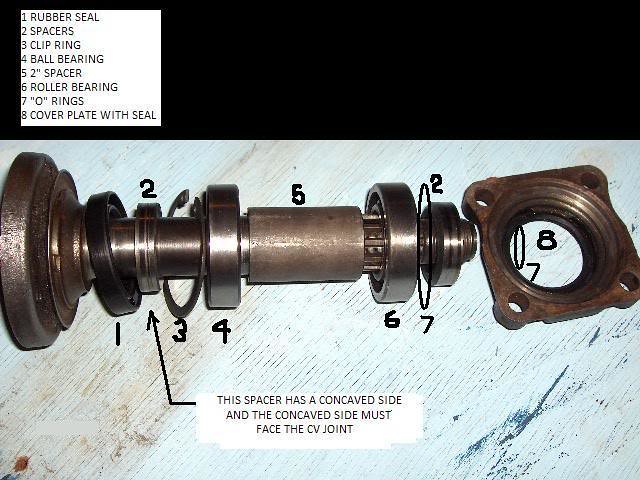
I had Friday off work last week and had 2 tasks on my list of things to do: Rear Trailing Arm rebuilds (ready for when the suspension goes to Red 9 for fitting and set-up next month) and Fuel Tank modifications to fit Suburu in tank pump into beetle fuel tank.

The Rear Trailing arm rebuilds went pretty much to plan just installing new bearings and seals, used the diagram I found on the Internet to make sure I got everything in the right place.
Image

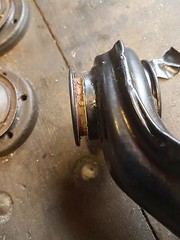
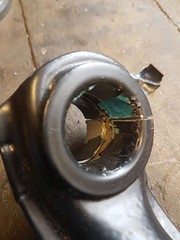
One schoolboy error I made though was I didn't realise that the bushes had an inner and outer metal sleeve and I left the outer sleeve in when I got the arms powder coated. Had to cut these out with a hacksaw so that I could get the new ones in. Got the new ones pressed in at my local garage for a donation to their tea and biscuit fund....
Image

Image

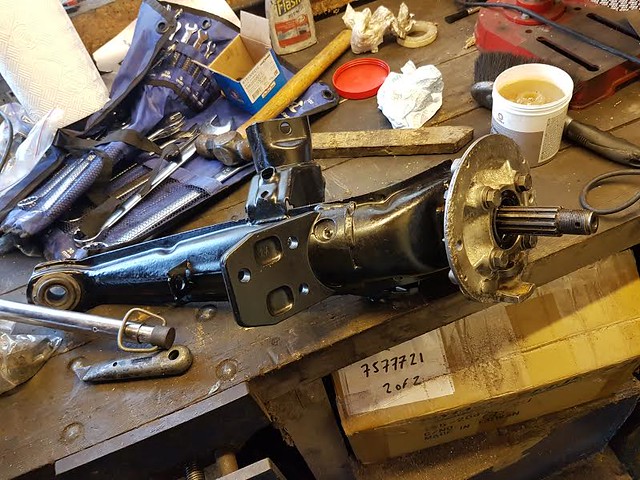
And here is one of the arms all assembled - just need to re-install the brakes when I get the chassis back home...
Image

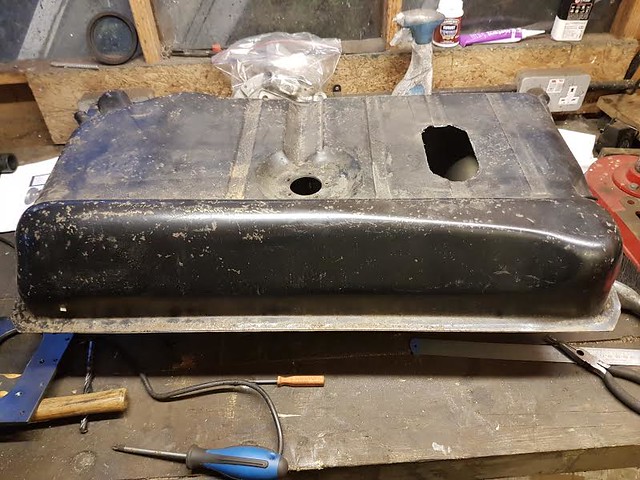
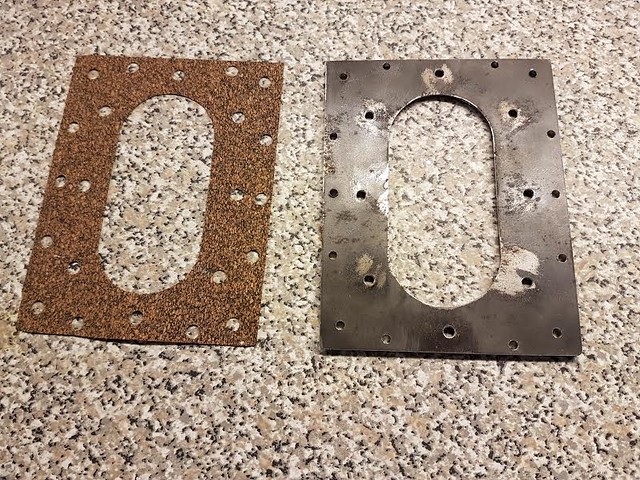
For the fuel tank, I had bought a pretty good original Beetle tank with just a bit of surface rust (£10) and a Suburu in-tank fuel pump set-up (£10) along with a AMF fuel tank adaptor (£28) all from EBAY. The AMF Fuel Tank plate is basically a laser cut plate that allows you to bolt up a Suburu pump to the plate. One word of warning on this is the holes for mounting the pump to the plate are also made with a Laser Cutter and therefore need careful drilling to ensure that when you tap the holes you can get a good seal around the threads. I decided to fit the plate with a cork gasket and nuts and bolts into the tank as I prefer this to welding a second hand tank.

This first picture is of the tank with a hole that I cut in it with a Dremel.
Image

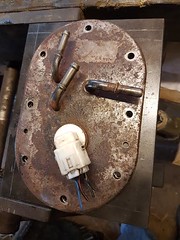
This is a picture of the pump where I fitted it up to the plate.
Image

Here is the finished plate along with the gasket I made from a sheet of Cork Gasket material.
Image

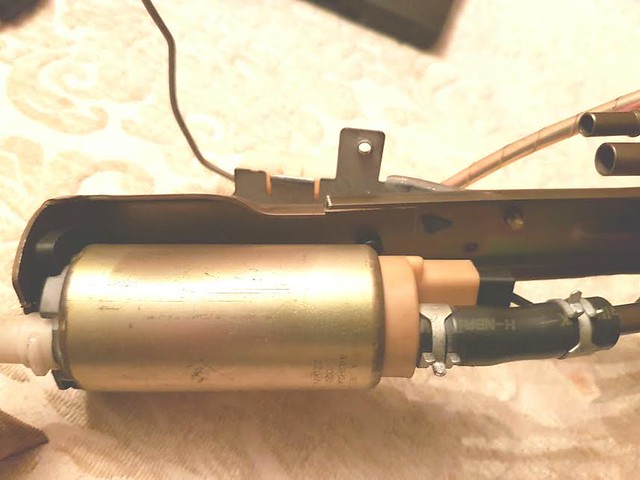
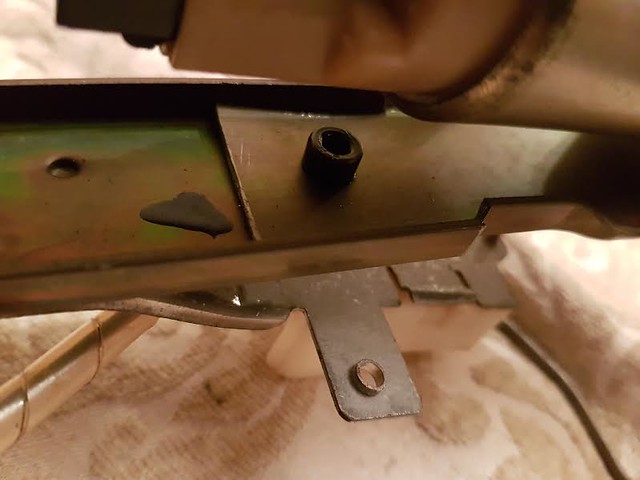
I also had to shorten the stem and the fuel delivery pipe on the Suburu pump by 5.5cm nad 5 cm respectively so that the that the feed pipe sits at the bottom of the beetle tank. I did by cutting through the main bar that connects the pump to the mounting plate then cutting off each side so that the two pieces would join together and just secured with a single bolt and locknut. I also had to make a slight bend in the sender wire to get it to cover the full empty to full range on the tank.
Image

Image

Just need to clean out the tank now of all the drilling debris and then fill in the two ridges on the tank with filler, bolt it all together with plenty of thread sealer and then paint it and make a blanking plate for the original Sender hole and then the tanks done.
Last edited by Robneal on Mon Jul 03, 2017 5:17 pm, edited 1 time in total.
Bruce M
Me and DDK sitting in a tree! KISSING
Posts: 2766
Joined: Fri Aug 27, 2004 1:07 pm

Burnt Pig - 356 Pre a Build Thread

Post by Bruce M »

And here is one of the arms all assembled - just need to re-install the brakes when I get the chassis back home...
Image
.
FWIW, the alloy calliper bracket is upside down. Or it might be on the wrong side too
Robneal
DDK above all
Posts: 197
Joined: Tue Jul 26, 2016 10:26 pm

Re: Burnt Pig - 356 Pre a Build Thread

Post by Robneal »

Thanks for that....copied one on a picture on the Internet so someone else got it wrong tooo. Will make swapping them over first priority at the weekend.

Sent from my SM-G930F using Tapatalk
Bruce M
Me and DDK sitting in a tree! KISSING
Posts: 2766
Joined: Fri Aug 27, 2004 1:07 pm

Re: Burnt Pig - 356 Pre a Build Thread

Post by Bruce M »

Couple of pics which might help. I can dig out more if needed. Notice the path of the handbrake conduit, supported by a fat cable tie attached to the two holes in front of the lower shock mount on the arm. If that makes sense.

Image

Image
mdmax72
Put a fork in me, I'm done!
Posts: 1512
Joined: Thu Sep 28, 2006 8:23 pm
Location: midlands u.k

Re: Burnt Pig - 356 Pre a Build Thread

Post by mdmax72 »

Something to think about Rob. What gauges are you going to use?. If your using the Subaru pump sender it may not be compatible with a VDO gauge.

Could you not have put the pump/sender on the other side of the tank that is flat to get a bettter seal.?

You'd have been fine welding a old fuel tank. Presuming it's not had no petrol in it for some time. Even so as long as its got no petrol vapours in it.
Rich

DDK Member 0547

Evolving Speedster Build ;-)
Robneal
DDK above all
Posts: 197
Joined: Tue Jul 26, 2016 10:26 pm

Re: Burnt Pig - 356 Pre a Build Thread

Post by Robneal »

I did look at fitting it on the other side but the tank is not actually flat on the other side although it may look it. But should be fine with a bit of filler to fill the ridges. Plus I am not very proficient at welding so thought the bolt in option was preferable. Will post up some pictures of the finished article and let you judge.
WRT the sender I have a number of options. Either get an external box to allow me to match the sender output to the guage, or refit an original beetle one, or some fuel gauges come.with universal senders, so when I get to that stage I have some options....

Sent from my SM-G930F using Tapatalk
Robneal
DDK above all
Posts: 197
Joined: Tue Jul 26, 2016 10:26 pm

Re: Burnt Pig - 356 Pre a Build Thread

Post by Robneal »

Here's the first view of my chassis in its new powder coat. It's now off to RED 9 to get the front double wishbone suspension added - I am not exactly sure what the fitting up issue is but having read the Rachael the replicant thread on VZi I know it needs some tweaks to make them fit together. Simon at RED 9 has said he will be able to modify his set-up to fit the Speedster Clinic chassis. Mid March is when it is due to be completed then I can really get started with the build.

Image

Image
Last edited by Robneal on Mon Jul 03, 2017 5:20 pm, edited 1 time in total.
User avatar
Spyder-finder
DDK Fanatic
Posts: 90
Joined: Wed Feb 01, 2006 10:40 am
Location: Rochester, England

Re: Burnt Pig - 356 Pre a Build Thread

Post by Spyder-finder »

The Spiyda Gauge Wizard is all you need to match any gauge to any sender. I have fitted several of these and they are a great bit of kit.
RS60, 550, 356 Speedster, 356 outlaw coupe, KTM RC8 and 1955 Norton Dominator 88

Why tip toe through life only to arrive safely at death!
Robneal
DDK above all
Posts: 197
Joined: Tue Jul 26, 2016 10:26 pm

Re: Burnt Pig - 356 Pre a Build Thread

Post by Robneal »

Spyder-finder wrote:The Spiyda Gauge Wizard is all you need to match any gauge to any sender. I have fitted several of these and they are a great bit of kit.
Cheers matey will put one on my shopping list. But God the list is long....

Sent from my SM-G930F using Tapatalk
Post Reply