

Karl,
That engine work you are doing is looking really good, I was surprised when I looked at page one of your thread you started all this work on the 356 10 years ago. I could see I was following your progress right back to the start! Its amazing just how fast those 10 years have gone or is it just me ? Great that you have stuck to it and its coming along just fine!
Roy
Under cover Resto
-
roy mawbey
- Put a fork in me, I'm done!
- Posts: 1852
- Joined: Thu Dec 25, 2008 2:28 pm
- Location: sunny sussex
Re: Under cover Resto
RHD 356A coupe super 75 106954

Re: Under cover Resto
Thanks,
Yes Roy, doesn''t the time fly, especially the older I get.
I bought the car in 2003 which I hadn't realized until you mentioned the time, makes this the 20th anniversary of it in my company.
It has always stuck in mind how you complimented my nice shut lines.
Although it is taking rather a long time for me to rebuild the engine, I'm enjoying the process and not having the pressure to rush it.
Thanks
Karl
Keep the Outlaw Faith
Re: Under cover Resto
So a progress report from me on the slow engine rebuild. Hopefully the engine won't be slow 
When I put the gears on the crank I took the liberty of chucking the third piece in the oven also.
With that warmed up , I hoped the new bearing would drop in almost by itself so when it didn't I got a little rushed in my mind
and subsequently balls it up.
Although I used the old bearing on top of the new bearing to hit it in, the large socket I used was used upside down which lead to me putting big dents in the new bearing face.
 20230418_134924 by karlhash, on Flickr
So I have ordered a new bearing from Porsche to go with the new rocker arms I also purchased.
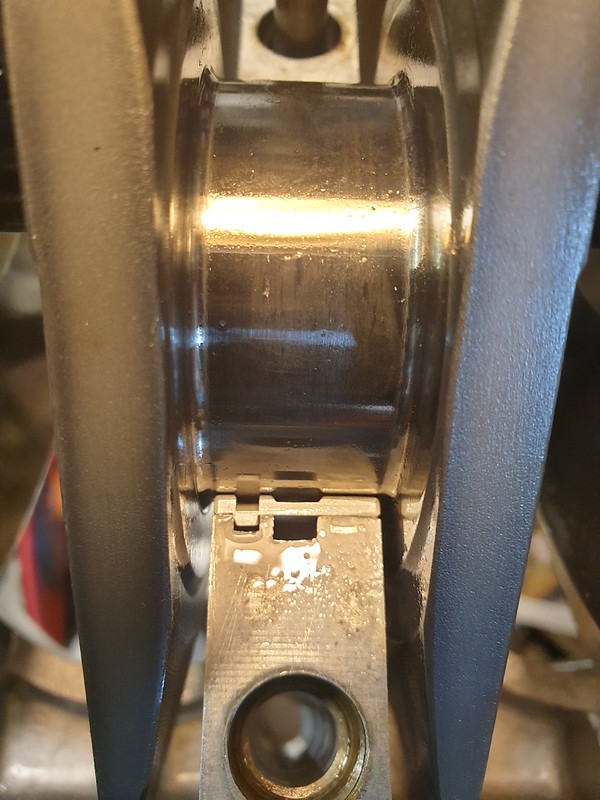
I put the new rocker shafts in the pillow blocks (I think that's what they're called) and added a comparison shot of new and old which will explain why new rockers are needed also.
 20230419_172651_001 by karlhash, on Flickr
A big lack of oil supply to that area of movement.
You can just spin the rocker shaft 180 degrees to get a a better surface but when I did that the rocker had too much play.
 20230419_163829 by karlhash, on Flickr
I went through all the rocker adjusters, ultrasonic cleaning and then brake cleaner making sure the oil ways through them are clear.
 20230518_153130 by karlhash, on Flickr
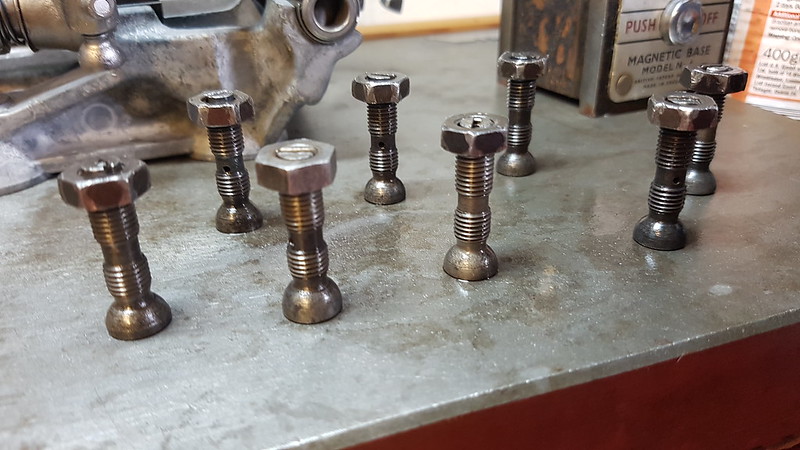
I measured the cylinder head washers thickness as the lower row of washers need to be equal to achieve good geometry. They all were close and I will be able to mix and match so the bottom row will be equal to 0.01mm
 20230510_192452 by karlhash, on Flickr
Re cleaned the case halves and shot WD40 through the oil ways again.
 20230519_162258 by karlhash, on Flickr
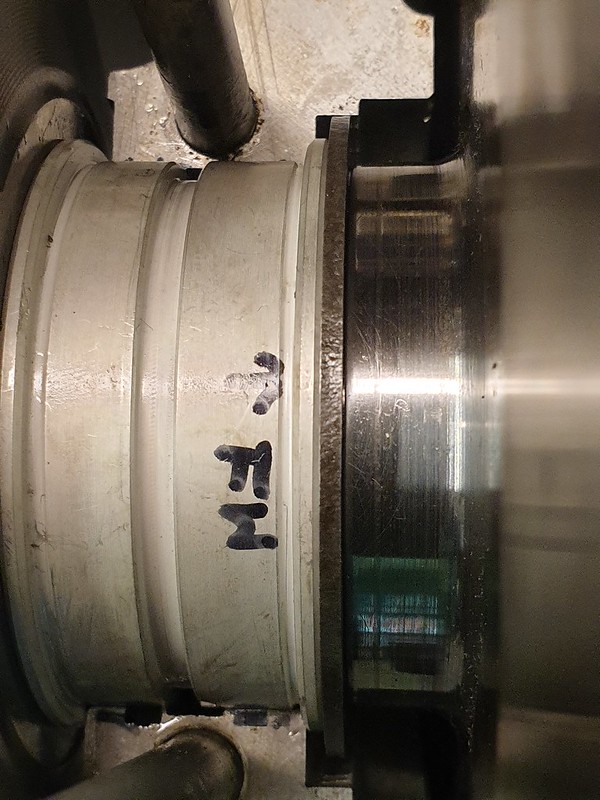
Put the mains bearings in to check the middle bearing interference that can occur on the pulley side with a new scat crank. When the crank is moved forward and backward in the endplay direction you can see where the bearing may interfere with the internal radius of the crank journal.
big gap
 20230519_165343 by karlhash, on Flickr
closed gap
 20230519_165353 by karlhash, on Flickr
If there is interference then chamfering the edge of the bearing is needed. I practiced on one of the old bearings with a de burring tool.
 20230424_160215 by karlhash, on Flickr
Then I went to bolt the case halves together but one of the bevelled washers would not fit because of the cylinder studs was getting in the way. I hadn't noticed this being a problem when I took it apart.
 20230520_113225 by karlhash, on Flickr
So I turned one of the washers down for an easy fit.
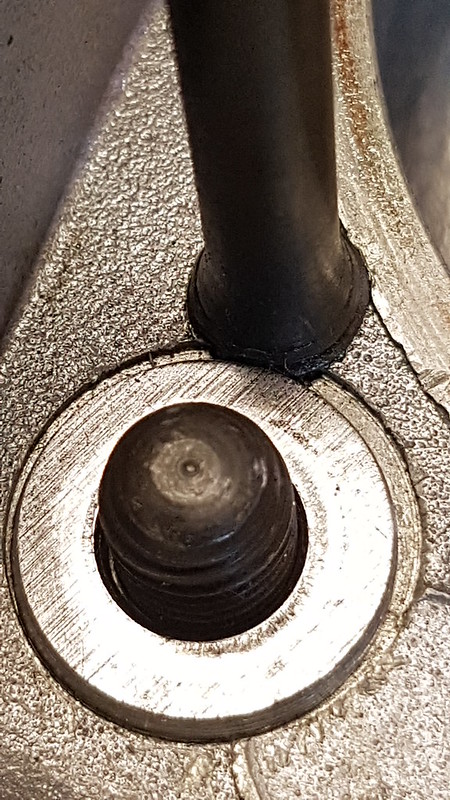 20230520_113120 by karlhash, on Flickr
Once I could bolt it together I was then able to Plastiguage the crank bearings and all seemed well there.
 20230520_150039 by karlhash, on Flickr
 20230520_150225 by karlhash, on Flickr
That's all for now folks, but hopefully I can bring you more sooner.
Thanks for listening
Karl
When I put the gears on the crank I took the liberty of chucking the third piece in the oven also.
With that warmed up , I hoped the new bearing would drop in almost by itself so when it didn't I got a little rushed in my mind
and subsequently balls it up.
Although I used the old bearing on top of the new bearing to hit it in, the large socket I used was used upside down which lead to me putting big dents in the new bearing face.
20230418_134924 by karlhash, on FlickrSo I have ordered a new bearing from Porsche to go with the new rocker arms I also purchased.
I put the new rocker shafts in the pillow blocks (I think that's what they're called) and added a comparison shot of new and old which will explain why new rockers are needed also.
20230419_172651_001 by karlhash, on FlickrA big lack of oil supply to that area of movement.
You can just spin the rocker shaft 180 degrees to get a a better surface but when I did that the rocker had too much play.
20230419_163829 by karlhash, on FlickrI went through all the rocker adjusters, ultrasonic cleaning and then brake cleaner making sure the oil ways through them are clear.
20230518_153130 by karlhash, on FlickrI measured the cylinder head washers thickness as the lower row of washers need to be equal to achieve good geometry. They all were close and I will be able to mix and match so the bottom row will be equal to 0.01mm
20230510_192452 by karlhash, on FlickrRe cleaned the case halves and shot WD40 through the oil ways again.
20230519_162258 by karlhash, on FlickrPut the mains bearings in to check the middle bearing interference that can occur on the pulley side with a new scat crank. When the crank is moved forward and backward in the endplay direction you can see where the bearing may interfere with the internal radius of the crank journal.
big gap
20230519_165343 by karlhash, on Flickrclosed gap
20230519_165353 by karlhash, on FlickrIf there is interference then chamfering the edge of the bearing is needed. I practiced on one of the old bearings with a de burring tool.
20230424_160215 by karlhash, on FlickrThen I went to bolt the case halves together but one of the bevelled washers would not fit because of the cylinder studs was getting in the way. I hadn't noticed this being a problem when I took it apart.
20230520_113225 by karlhash, on FlickrSo I turned one of the washers down for an easy fit.
20230520_113120 by karlhash, on FlickrOnce I could bolt it together I was then able to Plastiguage the crank bearings and all seemed well there.
20230520_150039 by karlhash, on Flickr20230520_150225 by karlhash, on FlickrThat's all for now folks, but hopefully I can bring you more sooner.
Thanks for listening
Karl
Keep the Outlaw Faith
-
Gary71
- Nurse, I think I need some assistance
- Posts: 10316
- Joined: Wed Mar 31, 2004 1:27 pm
- Location: Cheshire
- Contact:
Re: Under cover Resto
Looks great Karl, all those little careful details add up to a spot on build 

Re: Under cover Resto
Top thread Karl
Have you done this before?
Have you done this before?
maverick
noun
1. an unorthodox or independent-minded person.
2. an unbranded calf or yearling.
Origin mid 19th century: from the name of Samuel A. Maverick (1803–70), a Texas rancher who did not brand his cattle.
noun
1. an unorthodox or independent-minded person.
2. an unbranded calf or yearling.
Origin mid 19th century: from the name of Samuel A. Maverick (1803–70), a Texas rancher who did not brand his cattle.
-
neilbardsley
- Nurse, I think I need some assistance
- Posts: 7793
- Joined: Mon Apr 16, 2012 4:31 pm
Re: Under cover Resto
Well done. Lots of attention to deal. I think you will get the engine your effort deserves. When you get there have you considered how to break it in. Ive heard that during the first few minutes the cam and followers are important? Maybe, let someone with an engine Dyno/running stand so it?
Ps why Plastiguage on the bearings?
Sent from my 22011119UY using Tapatalk
Ps why Plastiguage on the bearings?
Sent from my 22011119UY using Tapatalk
“A REMINDER. I would be grateful if those members who have borrowed bits from me in emergencies (e.g starter motor, oil cooler, etc) would return them and/or contact me”. – Chris Turner RIP
Re: Under cover Resto
Plastigauge is to check the clearance on the bearings to the crank. Its got to be within tolerance for oil to do its work and for the engine not to knock or lock up.
And an old Porsche mechanic once told me that the cam break in was a bit of an old wives tale with Porsche engines it has more to do with the American V8 engines. It’s more important to break in the piston rings to the barrels by not labouring the engine or driving costanatly at a light load/ low revs.
Think of a race car engine. They are normally run in on a dynamometer at various loads and revs to get the rings broken in. Then it lives its life at high revs until its rebuilt.
1966 912
1969 912/6 hotish rod in build
1974 914 Dead
LI 125 Lambretta (Yeah right it’s a 125)
Mini Cooper s
1969 912/6 hotish rod in build
1974 914 Dead
LI 125 Lambretta (Yeah right it’s a 125)
Mini Cooper s
Re: Under cover Resto
Thanks Gary, what's the saying, take care of the pennies and they look after the pounds.........or something along those lines.
Hugo I have disassembled and rebuilt the engine when I first got it to solve some major oil leeks, but
taking care in the detailed specs I haven't. I've always wanted to do it since owning beetles when I was younger.
Neil I used the Plastiguage method as a cheap alternative to expensive micrometers.
The Neutek cam leaflet says to run it for 20 mins or so at 2 or 3 thousand rpm for intial break in.
I wont worry about dyno's just so long as its run in healthy manner for now. Fine tuning is way off in my mind still.
So rookie procedures equals more mistakes.
I put the crank in the case, put the cam in to feel how smoothly the mesh together and binding in 4 positions .
Looking at the cam wheel it binds at north south east and west.
So I carefully file the cam gear until there was no more binding......But now I had a load of backlash. POOOOO
Looking back over my progress I realised the when i heated the steel gear to put on the crank It hadn't dropped on like I expected it
would do. So I knocked it down with a socket extension and hammer.
Where I have hammered it, it has deformed the edges of the gear. More embarrassment.
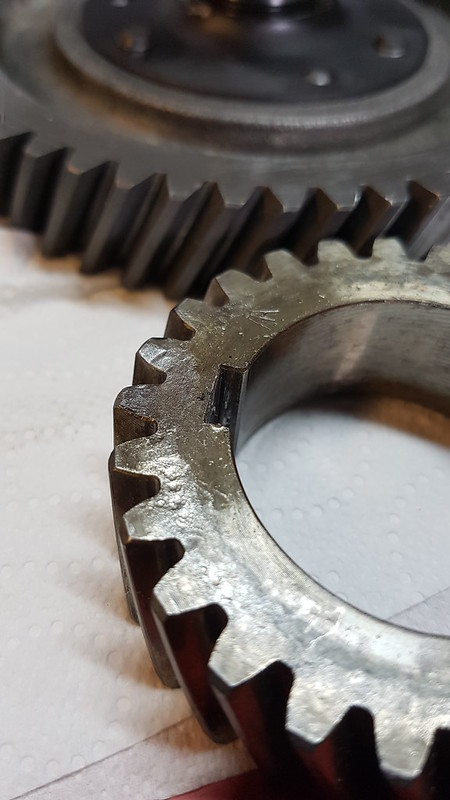 20230523_124544 by karlhash, on Flickr
So I went down to PRS and Paul Smith who was wonderful as ever, looked after me supplying a new set of straight cut gears, pushrod tubes and some sundries.
As I was getting a little excited about the prospect of nearing completion I thought about the poor battery Ive left for so long unattended.
I had thought that it may have died and may not be able to be recharged but I had a shock when I took it out.
It had massive cracks in the top. Apparently the cells can swell and cause this. So new battery needed then.
 20230524_192110 by karlhash, on Flickr
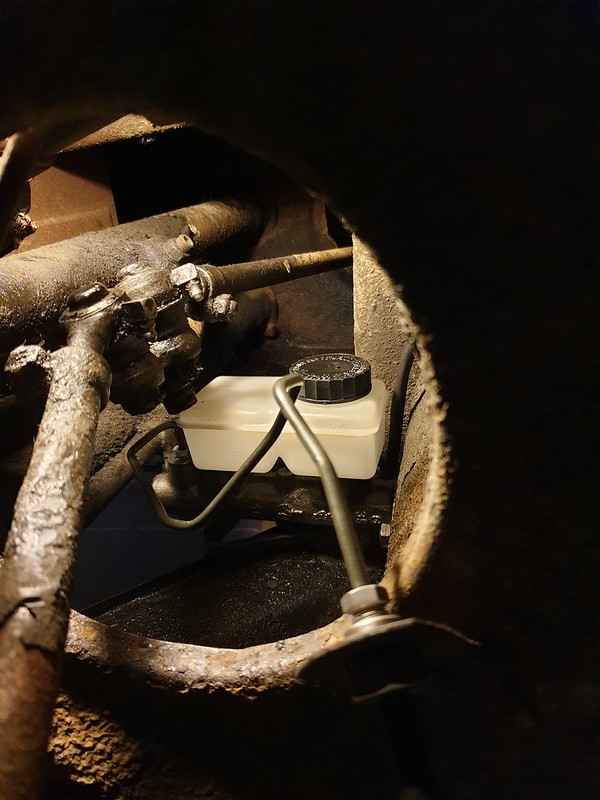
Whilst at the front of the car I had noticed some brake fluid in places so I checked the reservoir ....... empty!
I had rebuilt the master cylinder before but as this has happened and with safety in mind I bought a dual circuit master cylinder to take it's place.
And because the brake fluid had leaked , the pedal box was wet and rusty and flaky. So I took those out to paint and clean up.
 20230527_114515 by karlhash, on Flickr
 20230527_142601 by karlhash, on Flickr
The toe boards were de laminating so glued those together.
 20230604_113030 by karlhash, on Flickr
 20230605_124527 by karlhash, on Flickr
Getting a little side tracked, because the front area has never really been clean I took the tank out to lightly sand and T cut but mainly to put in new felt underneath and around the straps.
 20230605_182817 by karlhash, on Flickr
 20230608_172327 by karlhash, on Flickr
For the new master cylinder I made connections for the wires because the new brake switch has spade terminals and the old original wires have circular screw fittings that I didn't want to chop off,
returning to original and all that. I rubber booted the lot in an attempt to keep the water out.
 20230610_132749 by karlhash, on Flickr
Put some rubber sleeve on the old lines for a bit of added security as sparks and fuel don't mix well
 20230610_181241 by karlhash, on Flickr
Rubber boot and grommet for fuel line had all corroded so replaced those also.
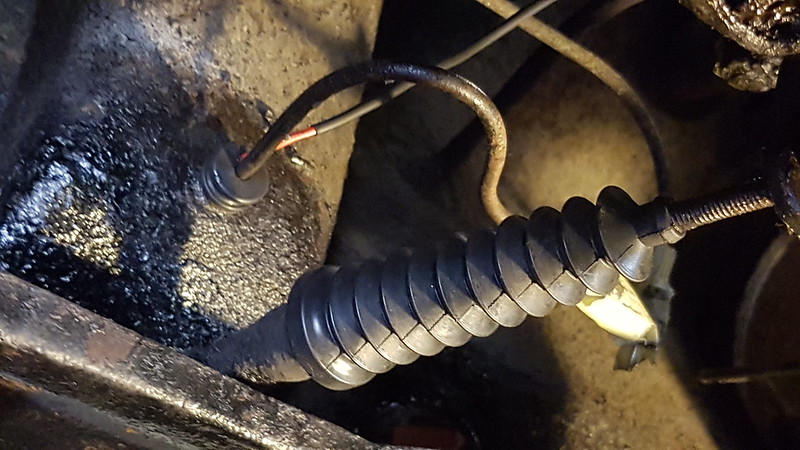 20230611_155701 by karlhash, on Flickr
Progress report for now done , may be a while until the next as I'm in for hand surgery on Duputrens contracture, which progressively pulls your fingers closed. Having my little finger done.
All the best
Karl
Hugo I have disassembled and rebuilt the engine when I first got it to solve some major oil leeks, but
taking care in the detailed specs I haven't. I've always wanted to do it since owning beetles when I was younger.
Neil I used the Plastiguage method as a cheap alternative to expensive micrometers.
The Neutek cam leaflet says to run it for 20 mins or so at 2 or 3 thousand rpm for intial break in.
I wont worry about dyno's just so long as its run in healthy manner for now. Fine tuning is way off in my mind still.
So rookie procedures equals more mistakes.
I put the crank in the case, put the cam in to feel how smoothly the mesh together and binding in 4 positions .
Looking at the cam wheel it binds at north south east and west.
So I carefully file the cam gear until there was no more binding......But now I had a load of backlash. POOOOO
Looking back over my progress I realised the when i heated the steel gear to put on the crank It hadn't dropped on like I expected it
would do. So I knocked it down with a socket extension and hammer.
Where I have hammered it, it has deformed the edges of the gear. More embarrassment.
20230523_124544 by karlhash, on FlickrSo I went down to PRS and Paul Smith who was wonderful as ever, looked after me supplying a new set of straight cut gears, pushrod tubes and some sundries.
As I was getting a little excited about the prospect of nearing completion I thought about the poor battery Ive left for so long unattended.
I had thought that it may have died and may not be able to be recharged but I had a shock when I took it out.
It had massive cracks in the top. Apparently the cells can swell and cause this. So new battery needed then.
20230524_192110 by karlhash, on FlickrWhilst at the front of the car I had noticed some brake fluid in places so I checked the reservoir ....... empty!
I had rebuilt the master cylinder before but as this has happened and with safety in mind I bought a dual circuit master cylinder to take it's place.
And because the brake fluid had leaked , the pedal box was wet and rusty and flaky. So I took those out to paint and clean up.
20230527_114515 by karlhash, on Flickr20230527_142601 by karlhash, on FlickrThe toe boards were de laminating so glued those together.
20230604_113030 by karlhash, on Flickr20230605_124527 by karlhash, on FlickrGetting a little side tracked, because the front area has never really been clean I took the tank out to lightly sand and T cut but mainly to put in new felt underneath and around the straps.
20230605_182817 by karlhash, on Flickr20230608_172327 by karlhash, on FlickrFor the new master cylinder I made connections for the wires because the new brake switch has spade terminals and the old original wires have circular screw fittings that I didn't want to chop off,
returning to original and all that. I rubber booted the lot in an attempt to keep the water out.
20230610_132749 by karlhash, on FlickrPut some rubber sleeve on the old lines for a bit of added security as sparks and fuel don't mix well
20230610_181241 by karlhash, on FlickrRubber boot and grommet for fuel line had all corroded so replaced those also.
20230611_155701 by karlhash, on FlickrProgress report for now done , may be a while until the next as I'm in for hand surgery on Duputrens contracture, which progressively pulls your fingers closed. Having my little finger done.
All the best
Karl
Last edited by hashman on Sun Jun 18, 2023 5:02 pm, edited 1 time in total.
Keep the Outlaw Faith

Re: Under cover Resto
Thanks for the update . All starting to come together 
James
1973 911 2.4S
1993 964 C2
2010 987 Spyder
1973 MGB Roadster
Its not how fast you go, but how you go fast
1973 911 2.4S
1993 964 C2
2010 987 Spyder
1973 MGB Roadster
Its not how fast you go, but how you go fast
-
Lightweight_911
- Nurse, I think I need some assistance
- Posts: 16903
- Joined: Wed Nov 12, 2003 10:48 pm
- Location: Worcs/W Mids border
Re: Under cover Resto
.
Some great progress (plus the odd setback) Karl - hope the surgery goes well.
.
Some great progress (plus the odd setback) Karl - hope the surgery goes well.
.
Andy
“Adding power makes you faster on the straights;
- subtracting weight makes you faster everywhere”
“Adding power makes you faster on the straights;
- subtracting weight makes you faster everywhere”
Re: Under cover Resto
Cheers James, your travel thread and the realization that I haven't driven the car in three years has given me more enthusiasm to get it finished.
Thanks Andy and thanks for the google pic hosting advice. I was holding back on images because i have almost maxed out my free flickr account.
Floor before clean up

cleaned foor, new unleaded safe rubber fuel line from tank and painted pedals in

This is my oil filter can. I had used an orange from Halfords but it was no where near the colour it said it was

so i got a can of chevy engine orange from frost, much closer.

Karl
Thanks Andy and thanks for the google pic hosting advice. I was holding back on images because i have almost maxed out my free flickr account.
Floor before clean up
cleaned foor, new unleaded safe rubber fuel line from tank and painted pedals in
This is my oil filter can. I had used an orange from Halfords but it was no where near the colour it said it was
so i got a can of chevy engine orange from frost, much closer.
Karl
Keep the Outlaw Faith
Re: Under cover Resto
Well that google hosting did work , but why have they disappeared now?
Is it me or does all this new technology seem less logical the more advanced it becomes! I must just be getting old.
My hand operation went well, just need full strength to come back properly now.
I have managed to get some work done on the car.
Brakes first ...... I bent some new front hard lines to fit the new dual master cylinder.
 20230819_160838 by karlhash, on Flickr
and I was going to mount the reservoir higher up but decided to go with the less leaky solution mounted on the master cylinder itself.
 20230819_173822 by karlhash, on Flickr
I used this little pipe bender , found it rather useful.
 20230815_175154 by karlhash, on Flickr
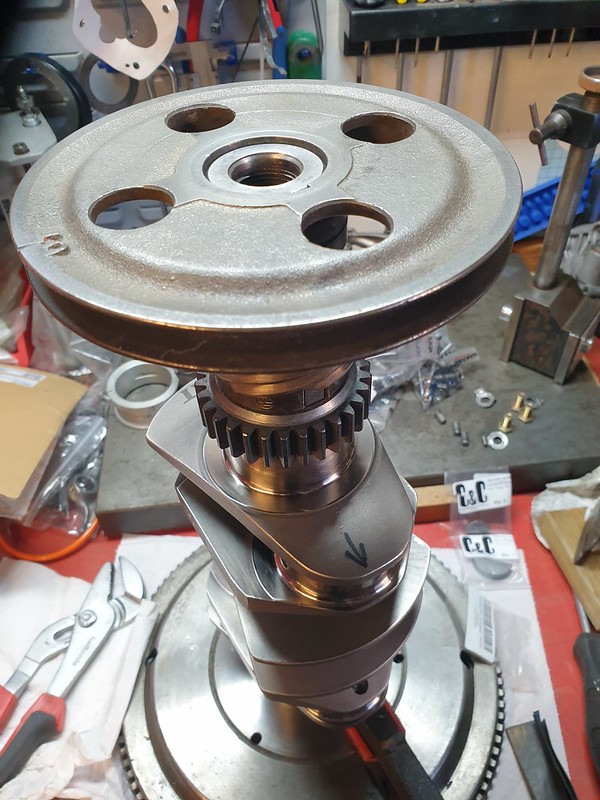
Back onto the engine and refitting of the timing gear onto the crank. I had to make sure I heated it up enough this time, so when it didn't go on easily again I had to take a closer look at why.
I thought the woodruff key may be standing too proud so I went to take it out but would it budge, like fook would it.
So I ended up cutting a slot down the length of the key, this took a few days as my little dremel tool kept running out of battery.
 20230804_115813 by karlhash, on Flickr
 20230807_192520 by karlhash, on Flickr
Eventually it came out and the crank was fairly unscathed.
 20230809_160908 by karlhash, on Flickr
I bought new woodruff keys and when they wouldn't fit either I measured the slot in the crank to find it was actually tapered on the sides.
If I had just left a regular key bashed in the crank it could deform the crank and given me other problems down the line.
So I filed the sides of the woodruff key to a matching taper with enough interference fit still. That takes some time I can tell ya!
Did the same for the pulley key too. Fits nicely now.
 20230918_173232 by karlhash, on Flickr
So, key in, heat up timing gear to correct temperature and this time it drops on nicely........hallelujah.
Then the distributor gear but I found putting that under the grill was more effective than chucking it in the oven as I had done previously.
 20230918_173201 by karlhash, on Flickr
New straight cut gear on cam and into case with crank. All runs smoothly this time with the correct amount of backlash. Woohoo.
 20230903_162056 by karlhash, on Flickr
 20230918_175759 by karlhash, on Flickr
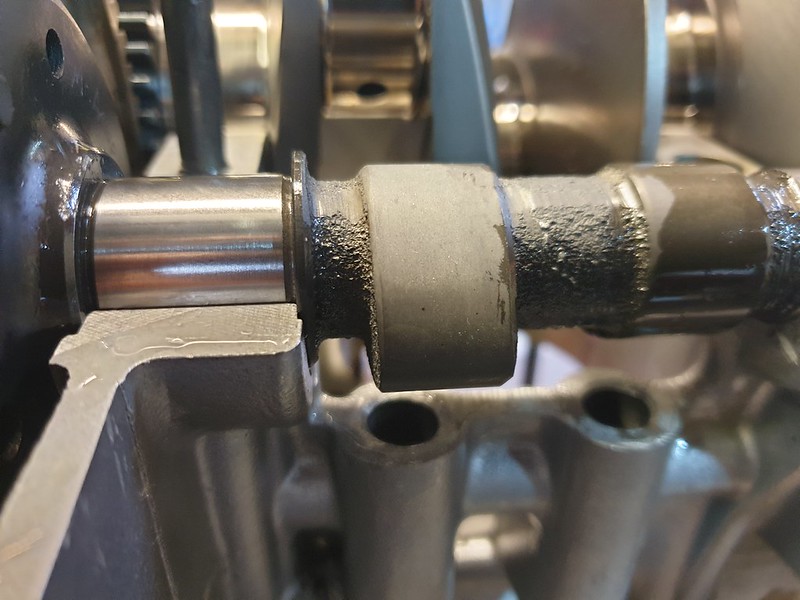
Next was setting the end play.
when I checked this before pertaining to the bearing interference with a scat crank, I didn't know that it needs to be checked with the fly wheel on and the shim in place.
 20230920_190749 by karlhash, on Flickr
My shim was too thick so I had to sand it down a few thousands of a mm
 20230923_175600 by karlhash, on Flickr
Once I had the correct thickness I found that the bearing issue was not a problem and I wouldn't have to chamfer the bearing.
 20230927_170609 by karlhash, on Flickr
Thanks
Karl
Is it me or does all this new technology seem less logical the more advanced it becomes! I must just be getting old.
My hand operation went well, just need full strength to come back properly now.
I have managed to get some work done on the car.
Brakes first ...... I bent some new front hard lines to fit the new dual master cylinder.
20230819_160838 by karlhash, on Flickrand I was going to mount the reservoir higher up but decided to go with the less leaky solution mounted on the master cylinder itself.
20230819_173822 by karlhash, on FlickrI used this little pipe bender , found it rather useful.
20230815_175154 by karlhash, on FlickrBack onto the engine and refitting of the timing gear onto the crank. I had to make sure I heated it up enough this time, so when it didn't go on easily again I had to take a closer look at why.
I thought the woodruff key may be standing too proud so I went to take it out but would it budge, like fook would it.
So I ended up cutting a slot down the length of the key, this took a few days as my little dremel tool kept running out of battery.
20230804_115813 by karlhash, on Flickr20230807_192520 by karlhash, on FlickrEventually it came out and the crank was fairly unscathed.
20230809_160908 by karlhash, on FlickrI bought new woodruff keys and when they wouldn't fit either I measured the slot in the crank to find it was actually tapered on the sides.
If I had just left a regular key bashed in the crank it could deform the crank and given me other problems down the line.
So I filed the sides of the woodruff key to a matching taper with enough interference fit still. That takes some time I can tell ya!
Did the same for the pulley key too. Fits nicely now.
20230918_173232 by karlhash, on FlickrSo, key in, heat up timing gear to correct temperature and this time it drops on nicely........hallelujah.
Then the distributor gear but I found putting that under the grill was more effective than chucking it in the oven as I had done previously.
20230918_173201 by karlhash, on FlickrNew straight cut gear on cam and into case with crank. All runs smoothly this time with the correct amount of backlash. Woohoo.
20230903_162056 by karlhash, on Flickr20230918_175759 by karlhash, on FlickrNext was setting the end play.
when I checked this before pertaining to the bearing interference with a scat crank, I didn't know that it needs to be checked with the fly wheel on and the shim in place.
20230920_190749 by karlhash, on FlickrMy shim was too thick so I had to sand it down a few thousands of a mm
20230923_175600 by karlhash, on FlickrOnce I had the correct thickness I found that the bearing issue was not a problem and I wouldn't have to chamfer the bearing.
20230927_170609 by karlhash, on FlickrThanks
Karl
Keep the Outlaw Faith
-
Lightweight_911
- Nurse, I think I need some assistance
- Posts: 16903
- Joined: Wed Nov 12, 2003 10:48 pm
- Location: Worcs/W Mids border
Re: Under cover Resto
.
Great update Karl -the engine build's coming along nicely ...
.
Great update Karl -the engine build's coming along nicely ...
.
Andy
“Adding power makes you faster on the straights;
- subtracting weight makes you faster everywhere”
“Adding power makes you faster on the straights;
- subtracting weight makes you faster everywhere”
-
Bootsy

- Site admin and the Boss
- Posts: 23978
- Joined: Sat Nov 08, 2003 6:09 pm
- Location: Norwich
- Contact:
Re: Under cover Resto
Ditto! Hope you and yours are keeping well.
1972 911T | 1994 993 Carrera | 1999 986 Boxster | 1990 T25 Camper
Vintage Heuer, Omega, Zenith and other vintage watches - http://www.heuerheritage.co.uk
Vintage Heuer, Omega, Zenith and other vintage watches - http://www.heuerheritage.co.uk
Re: Under cover Resto
That crank looks the business!
maverick
noun
1. an unorthodox or independent-minded person.
2. an unbranded calf or yearling.
Origin mid 19th century: from the name of Samuel A. Maverick (1803–70), a Texas rancher who did not brand his cattle.
noun
1. an unorthodox or independent-minded person.
2. an unbranded calf or yearling.
Origin mid 19th century: from the name of Samuel A. Maverick (1803–70), a Texas rancher who did not brand his cattle.