

"Le Belgique" ST build.
Moderator: Bootsy

Re: "La Granny" ST build.
nice  although maybe a little OTT for a race number light
James
1973 911 2.4S
1993 964 C2
2010 987 Spyder
1973 MGB Roadster
Its not how fast you go, but how you go fast
1973 911 2.4S
1993 964 C2
2010 987 Spyder
1973 MGB Roadster
Its not how fast you go, but how you go fast
-
stretch
- Me and DDK sitting in a tree! KISSING
- Posts: 2686
- Joined: Thu May 21, 2009 2:54 pm
- Location: Kent
Re: "La Granny" ST build.
Yes James, a bit OTT. I will only install the one on the rear decklid.
70T barn find...... to ST.
1998 C2 996 Kettle
1998 C2 996 Kettle
-
haasad
- Me and DDK sitting in a tree! KISSING
- Posts: 2568
- Joined: Tue Oct 19, 2004 8:46 pm
- Location: Dorchester
Re: "La Granny" ST build.
That is an "uber cool" detail just love things like that. Cant wait to see this build progress.
Andy
Andy
ddk member# 1527
Austin Healey 100/6, 1957 Fast Road ( now sold)
75 2.7 S backdated to "r" and very light (now sold).
Adria Camper
Buddy McCrae kneeboard.
Friar Tuck kneeboard.
Lots of Bicycles.
Austin Healey 100/6, 1957 Fast Road ( now sold)
75 2.7 S backdated to "r" and very light (now sold).
Adria Camper
Buddy McCrae kneeboard.
Friar Tuck kneeboard.
Lots of Bicycles.
-
Mitch
- Me and DDK sitting in a tree! KISSING
- Posts: 2671
- Joined: Tue Jun 21, 2005 6:32 pm
- Location: Not nearly close enough to the Nordschleife
Re: "La Granny" ST build.
Great to have contact with Willy Braillard... and cool light detail. I had one of those, but it was on a Beetle at the time! 
-
stretch
- Me and DDK sitting in a tree! KISSING
- Posts: 2686
- Joined: Thu May 21, 2009 2:54 pm
- Location: Kent
Re: "La Granny" ST build.

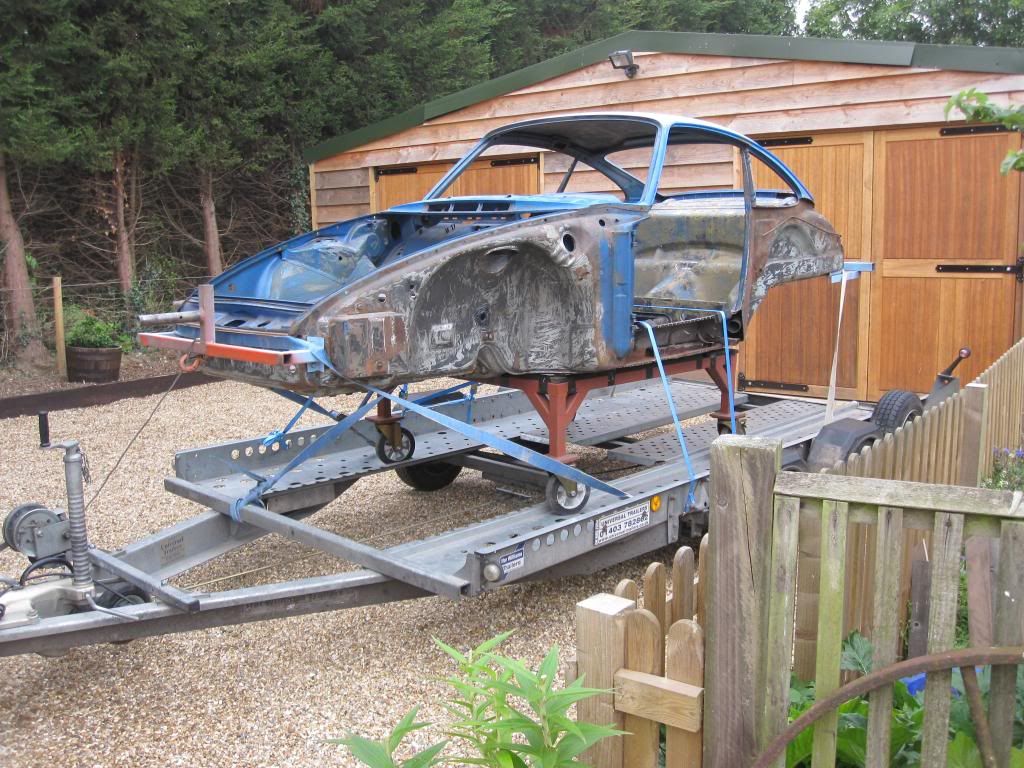
Thought it was a good time for a little update. Maybe i should have started this thread once it was nearly finished but, it was a real milestone for me to finally get my hands dirty after owning this car for nearly 4 years. As part of the deal with, "Er indoors" there was plenty of landscaping to do around the Man shed. Now that is nearly completed and i am being fed, time to push on.
So, i managed to finish off stripping the underseal.
Being an ST build, every bloody bit has to be removed. Including the underside of the dreaded parcelshelf. My days of tanking dark and dingy wine cellars helped me during this fun time.

Then it was time to cut out all the rust. Rear wings removed. Blimey, them spot weld drill bits don't last long

The previous owner of this car had part completed the rust repairs to the O/S sill area.
As this is going to be a period correct 70 ST build , i would need to remove the outer sill to allow for the installation of the "through the sill" 69-71 front cooler oil lines.
The outer sill was a poor fit. I was suprised how easy it was to remove. Poor weld penetration being the cause. This resulted in me also removing the inner sill as i was concerned what i would find lurking behind it. I decided to drill straight through the inner at the top of the sill as the panel was fairly new and could be reused after a bit of tidying up if it was not buckled. There was evidence of some rust prevention, but not to my standard. In for a penny and all that.
Rear wing off. Now we are done for now.


The "S donor car is looking worse by the week. Suspension removed in preperation for blasting.
Mind you, it is a good place to sweep all my rubbish under.

A liitle bit of seam sealer removal next week. Remove all the trim brackets, and i hope to be ready for blasting end of the month. Also hoping to pull down the 2.2S engine next week with the help of a fellow DDK'r.
MFI pump will be going to the very talented Michael Burgess for a concours rebuild to match my engine specs. That's all folks!

70T barn find...... to ST.
1998 C2 996 Kettle
1998 C2 996 Kettle
-
Darren65

- Nurse, I think I need some assistance
- Posts: 7873
- Joined: Mon Dec 13, 2010 10:55 pm
- Location: North Wiltshire
- Contact:
Re: "La Granny" ST build.
Great solid looking shell Dave, you'll have it in paint by autumn!
Good luck with the engine strip down.
Good luck with the engine strip down.
Darren
72T 2.5... http://ddk-online.com/phpBB2/viewtopic.php?f=10&t=56183
73 2.4E ... http://ddk-online.com/phpBB2/viewtopic.php?f=10&t=44242
77 Carrera 3.0...to 74 3.0RS ... http://ddk-online.com/phpBB2/viewtopic.php?f=28&t=63389
72T 2.5... http://ddk-online.com/phpBB2/viewtopic.php?f=10&t=56183
73 2.4E ... http://ddk-online.com/phpBB2/viewtopic.php?f=10&t=44242
77 Carrera 3.0...to 74 3.0RS ... http://ddk-online.com/phpBB2/viewtopic.php?f=28&t=63389
-
DustyM
- I need to get out more!
- Posts: 3109
- Joined: Tue Apr 21, 2009 4:12 pm
- Location: Killaloe, Ireland
- Contact:
Re: "La Granny" ST build.
Good to see you rolling the sleeves up. Will be watching progress.
The spot weld bits last a lot longer if you dip them in light oil in between each weld you drill.
Who is Michael burgess? I also have an mfi pump I want rebuilt, was going to use mfiwerks in the US but someone this side of the Atlantic would be preferable.
Cheers
Jon
The spot weld bits last a lot longer if you dip them in light oil in between each weld you drill.
Who is Michael burgess? I also have an mfi pump I want rebuilt, was going to use mfiwerks in the US but someone this side of the Atlantic would be preferable.
Cheers
Jon
-
stretch
- Me and DDK sitting in a tree! KISSING
- Posts: 2686
- Joined: Thu May 21, 2009 2:54 pm
- Location: Kent
Re: "La Granny" ST build.
Hi Jon,
Nah, think i am on to a winner with these torque screws. All done now. Although i may need a front tank support. Will check this out when it is back from blasting and on my Celette jig. Might put them screws on Dragons Den though.
Michael Burgess is the Author of the recently released MFI book. He has also reproduced the MFI protractor sets. Google is your friend. His contact details will come up.
paint Darren ! Etch primer i reckon.
70T barn find...... to ST.
1998 C2 996 Kettle
1998 C2 996 Kettle
-
Bootsy

- Site admin and the Boss
- Posts: 23940
- Joined: Sat Nov 08, 2003 6:09 pm
- Location: Norwich
- Contact:
Re: "La Granny" ST build.
Does look an excellent shell as a base. Look forward to following the progress
1972 911T | 1994 993 Carrera | 1999 986 Boxster | 1990 T25 Camper
Vintage Heuer, Omega, Zenith and other vintage watches - http://www.heuerheritage.co.uk
Vintage Heuer, Omega, Zenith and other vintage watches - http://www.heuerheritage.co.uk
"La Granny" ST build.
Self drilling roofing screws?
Good tip
Good tip
Re: "La Granny" ST build.
Great thread - so did this actually race at Le Mans or are you styling it to look like the pics? - just excited to know.
Either way looking forward to see how this turns out
Thanks
P
Either way looking forward to see how this turns out
Thanks
P
964C2 plus other stuff inbound
-
DustyM
- I need to get out more!
- Posts: 3109
- Joined: Tue Apr 21, 2009 4:12 pm
- Location: Killaloe, Ireland
- Contact:
"La Granny" ST build.
Doesn't using those screws put a hole through both panels though? The idea of the spot weld bit is to only hole the panel you are discarding, leaving the other part undamaged ready for the new panel...
Unless I've mis-understood your method?
Cheers
Jon
Unless I've mis-understood your method?
Cheers
Jon
-
stretch
- Me and DDK sitting in a tree! KISSING
- Posts: 2686
- Joined: Thu May 21, 2009 2:54 pm
- Location: Kent
Re: "La Granny" ST build.
Depends how you use them Jon. If you are using a new outer sill you can pump it right through then plug well through to the new panel. Where i wanted to just break the weld, i would pull out most of the outer weld, countersink. Then use a blunt headed one until i hit the rust spot.
2 screws were all that was required to drill out the top of 1 outer sill.
You taught me that.
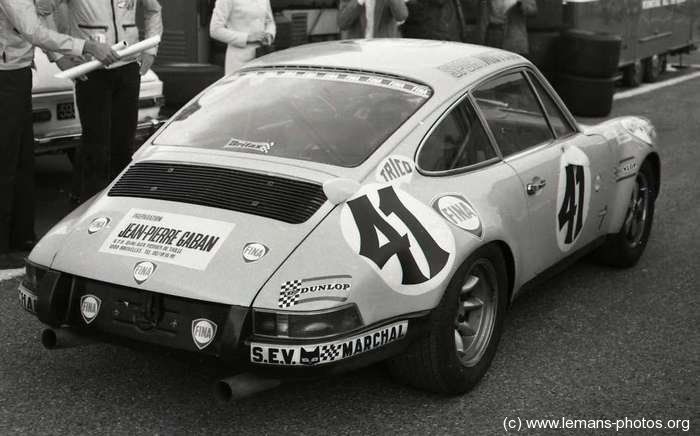
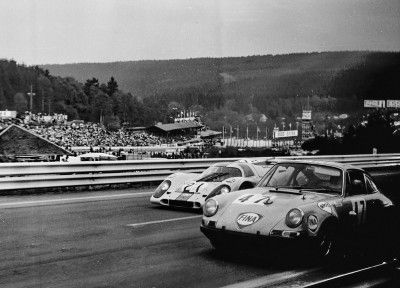
My car, Le Mans ! I wished. Just fancied trying to replicate an interesting car.
Once i had made contact with both drivers, it made it a more interesting project for me.
2 screws were all that was required to drill out the top of 1 outer sill.
You taught me that.
My car, Le Mans ! I wished. Just fancied trying to replicate an interesting car.
Once i had made contact with both drivers, it made it a more interesting project for me.
70T barn find...... to ST.
1998 C2 996 Kettle
1998 C2 996 Kettle
Re: "La Granny" ST build.
Bit relieved to be honest - I thought you were changing a car with racing provenance. I guess if you had been you would have been strung up long before I chimed in LOL.stretch wrote:Depends how you use them Jon. If you are using a new outer sill you can pump it right through then plug well through to the new panel. Where i wanted to just break the weld, i would pull out most of the outer weld, countersink. Then use a blunt headed one until i hit the rust spot.
2 screws were all that was required to drill out the top of 1 outer sill.
You taught me that.
My car, Le Mans ! I wished. Just fancied trying to replicate an interesting car.
Once i had made contact with both drivers, it made it a more interesting project for me.
Good luck with the project - its going to be great to see how this develops.
964C2 plus other stuff inbound
-
stretch
- Me and DDK sitting in a tree! KISSING
- Posts: 2686
- Joined: Thu May 21, 2009 2:54 pm
- Location: Kent
Re: "La Granny" ST build.
A small update.
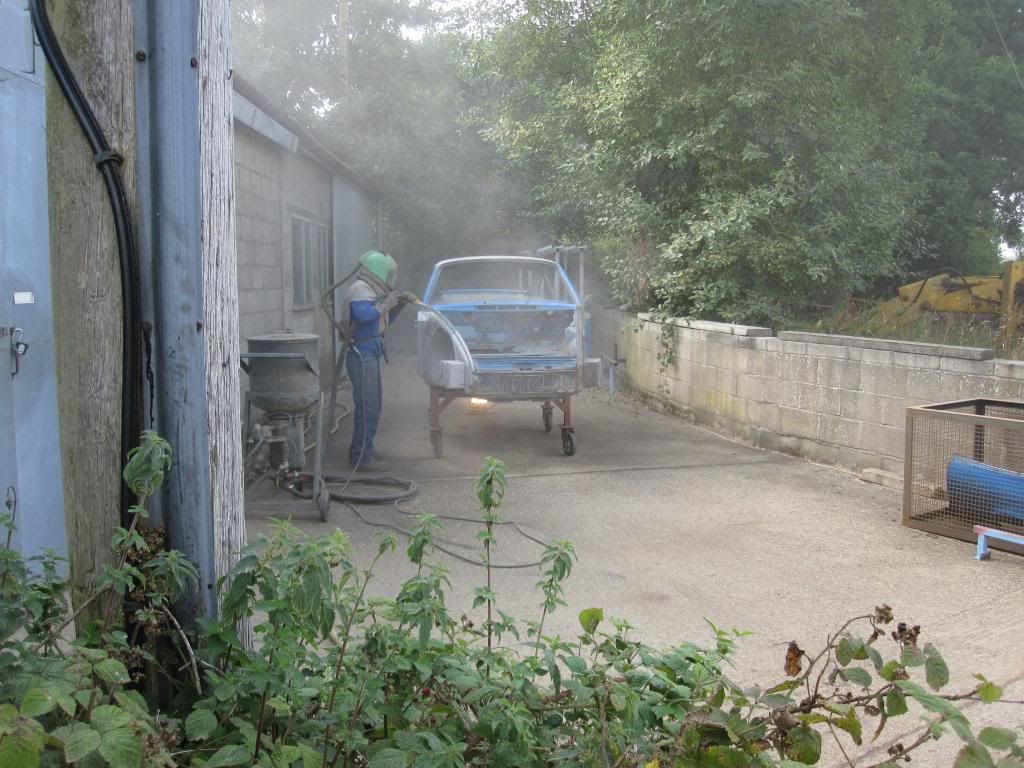
What with stripping the engine, and removing what i needed from the "Swampy S ". My next job was to get the shell back to bare metal. Having seen and heard of a few horror stories of chemical dipped shells, i decided that blasting was the method for me.
A slight unforseen delay resulted, as my blasting pal had upped sticks and shacked up with a bird up in Newcastle. Cheaper rent i reckon ! And they drink pints.
I was hoping the promise of a monkey, free beer and bed and breakast would have swayed it.
Nope, radio silence resulted. So i started the search for a suitable candidate to blast the old "Granny"
Having read the DDK blasting thread with great interest, i contacted Cleaning Consultants.
The Lady on the phone gave me a vague estimate and promised to get the boss to give me a firm quotation subject to me mailing over some pics of the shell. Well, his vague estimate was 30% more than the first quote. And this was subject to seeing the shell ! This didn't fill me with much confidence.
I suppose he was waiting to see me arrive, see what i was wearing before he decided on the "Porsche tax...
I then managed to find a bloke a couple of miles from home. Being a fussy sod, i went to put him on trial with a scrap engine lid. "Blast that with chilled iron mate" i ordered.
Having had a lot of experience with blasting in my job from a previous life, this engine lid challenge with heavy chilled iron would tell me if he was the man for the job. Yep, passed with flying colours.
I also insisted that i would like to be present for the whole process. I didn't fancy leaving my shell to be blasted and primed without me seeing it done correctly "Here mate, you missed a bit ".
He was more than happy for me to help, make the tea, sweep up etc.
Off i went, bright and early me and the "Granny". Last time in Blue.
Geoff the blaster set to work. A long day ahead. I sat on the sidelines like an expectant father.
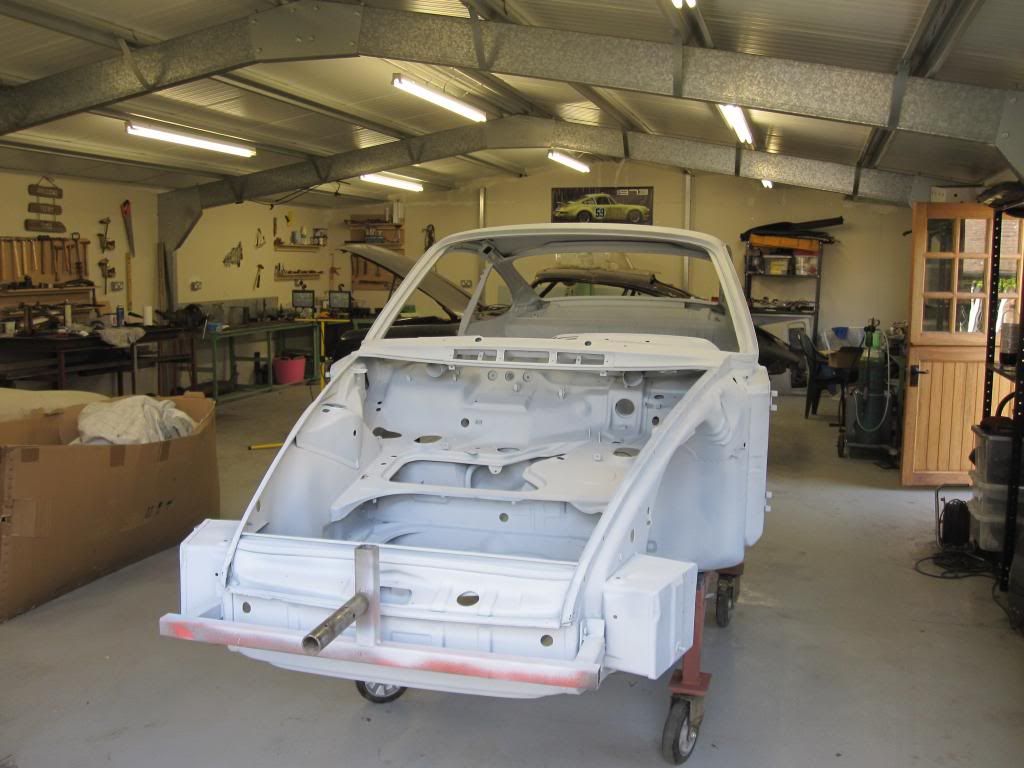
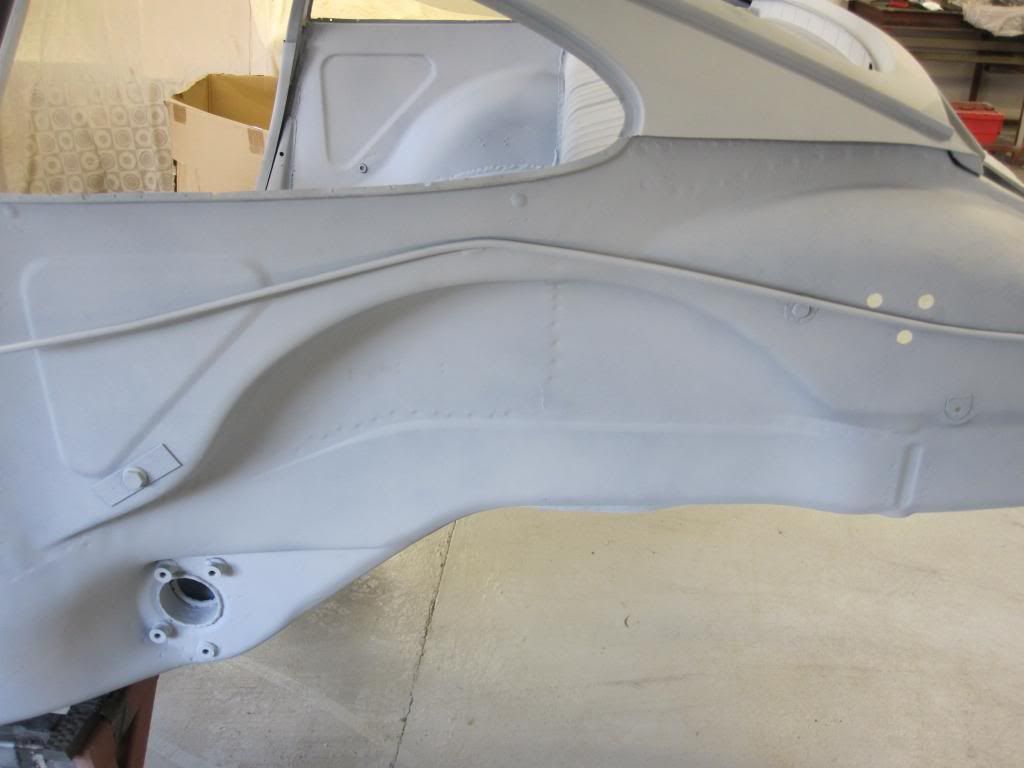
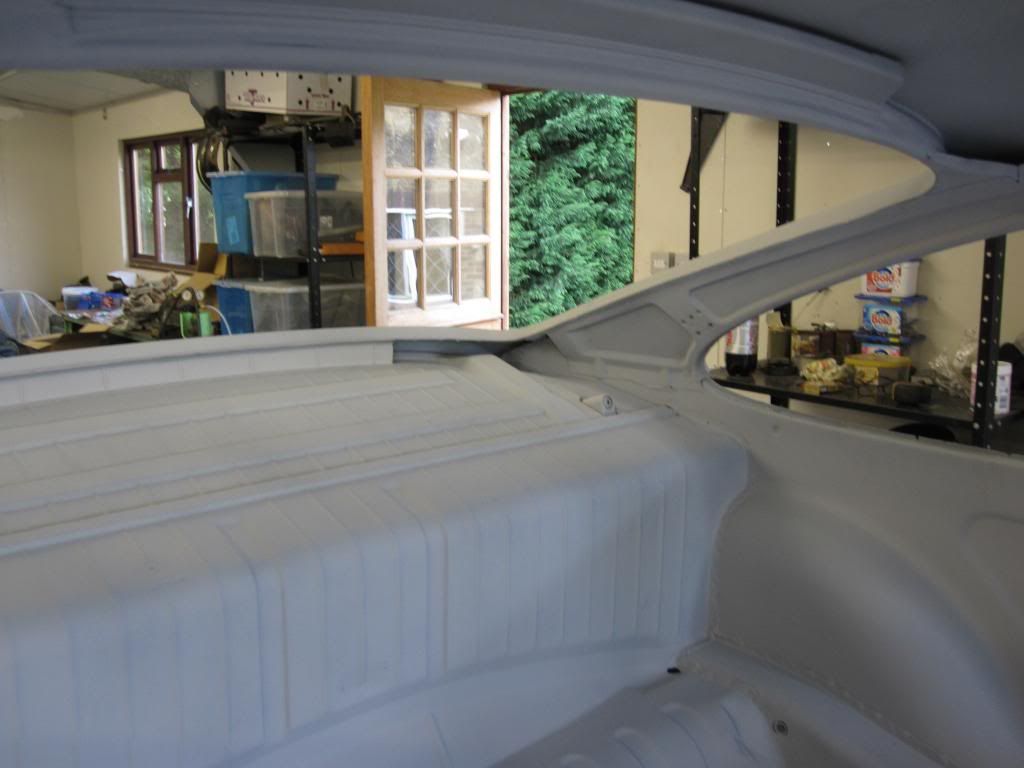
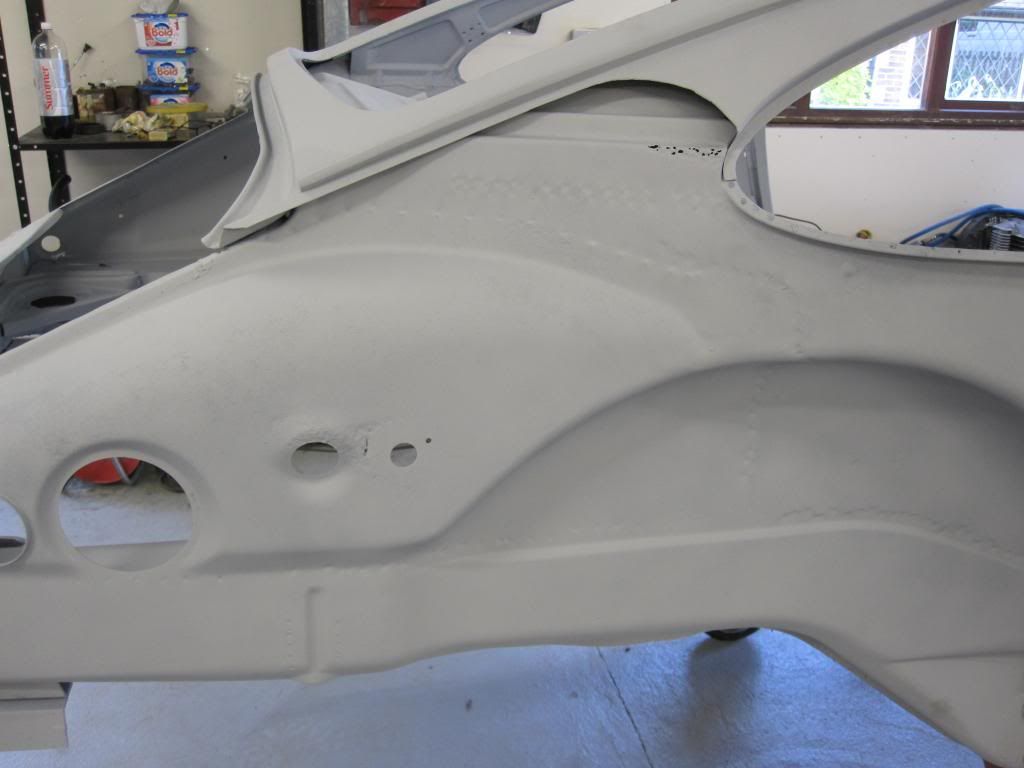
8 hours later, she was done. Swept, hoovered, primed.
No major suprises really. I had got pretty intimate with the shell over several weeks removing all the underseal and seam sealer.

Back home safely tucked up in the Mancave. A bit tricky getting it off solo. Phew!
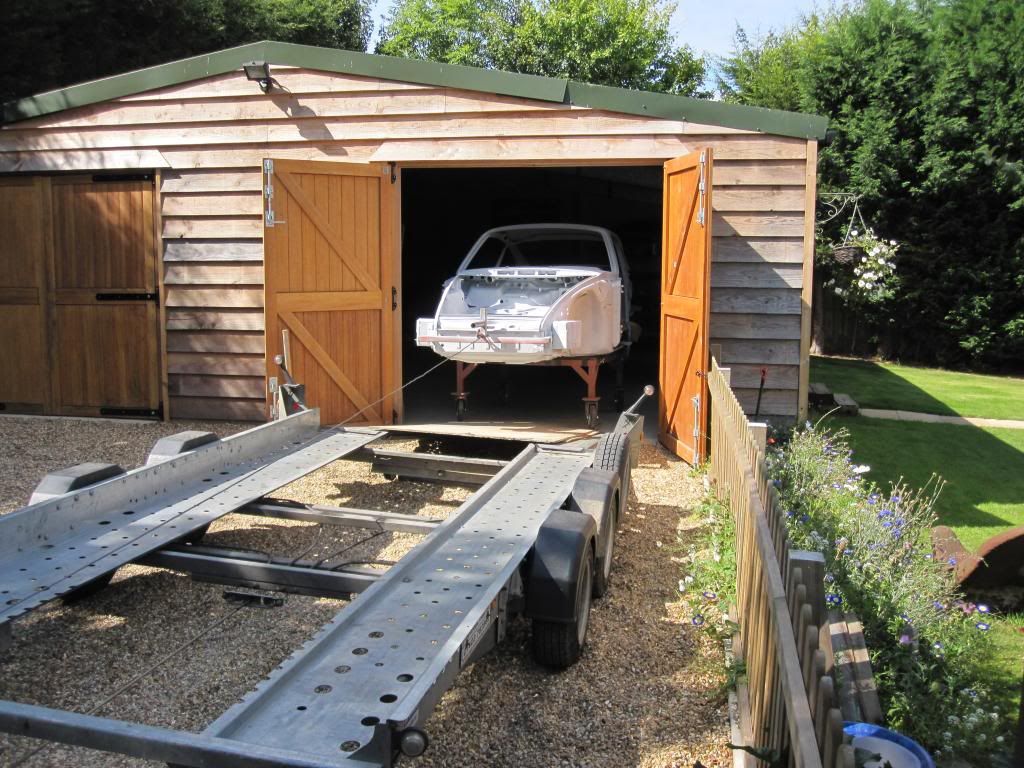
A few from the cave.
 dia/myST014_zps54d42608.jpg.html]
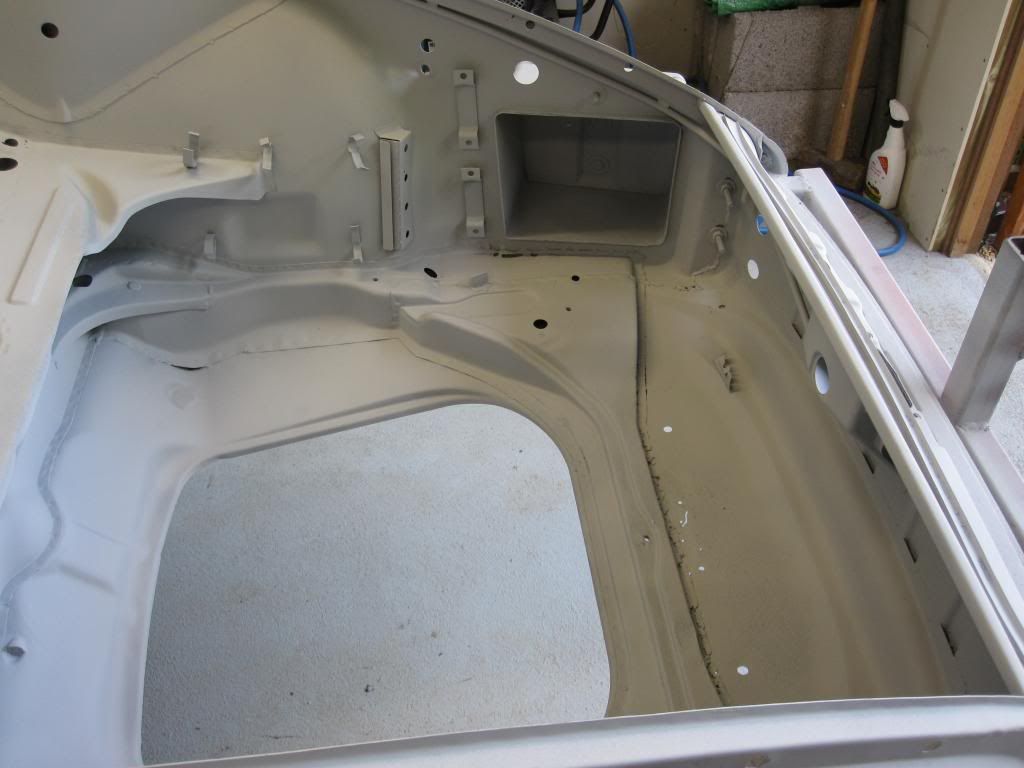 [/URL]
That's about it really. Blast and Powder coat this lot next week. Then await the return of my Cellette jig from a couple of DDK thieves !

And another period shot. " Le Granny" 1000km de Spa
Dave
What with stripping the engine, and removing what i needed from the "Swampy S ". My next job was to get the shell back to bare metal. Having seen and heard of a few horror stories of chemical dipped shells, i decided that blasting was the method for me.
A slight unforseen delay resulted, as my blasting pal had upped sticks and shacked up with a bird up in Newcastle. Cheaper rent i reckon ! And they drink pints.
I was hoping the promise of a monkey, free beer and bed and breakast would have swayed it.
Nope, radio silence resulted. So i started the search for a suitable candidate to blast the old "Granny"
Having read the DDK blasting thread with great interest, i contacted Cleaning Consultants.
The Lady on the phone gave me a vague estimate and promised to get the boss to give me a firm quotation subject to me mailing over some pics of the shell. Well, his vague estimate was 30% more than the first quote. And this was subject to seeing the shell ! This didn't fill me with much confidence.
I suppose he was waiting to see me arrive, see what i was wearing before he decided on the "Porsche tax...
I then managed to find a bloke a couple of miles from home. Being a fussy sod, i went to put him on trial with a scrap engine lid. "Blast that with chilled iron mate" i ordered.
Having had a lot of experience with blasting in my job from a previous life, this engine lid challenge with heavy chilled iron would tell me if he was the man for the job. Yep, passed with flying colours.
I also insisted that i would like to be present for the whole process. I didn't fancy leaving my shell to be blasted and primed without me seeing it done correctly "Here mate, you missed a bit ".
He was more than happy for me to help, make the tea, sweep up etc.
Off i went, bright and early me and the "Granny". Last time in Blue.

Geoff the blaster set to work. A long day ahead. I sat on the sidelines like an expectant father.
8 hours later, she was done. Swept, hoovered, primed.
No major suprises really. I had got pretty intimate with the shell over several weeks removing all the underseal and seam sealer.


Back home safely tucked up in the Mancave. A bit tricky getting it off solo. Phew!

A few from the cave.

 dia/myST014_zps54d42608.jpg.html][/URL]

That's about it really. Blast and Powder coat this lot next week. Then await the return of my Cellette jig from a couple of DDK thieves !

And another period shot. " Le Granny" 1000km de Spa
Dave

Last edited by stretch on Thu Aug 29, 2013 10:34 pm, edited 2 times in total.
70T barn find...... to ST.
1998 C2 996 Kettle
1998 C2 996 Kettle